
Setting VRM Template in Blender
Setting Anthro Canine Template

In the previous tutorial we covered the structure of the Anthro Canine Female/Male templates, now we will cover some VRM configurations and prepare the model for export. Note: at the time of writing this tutorial I am using version 2.20.12 of the VRM Add-on for Blender and Blender version 3.3.12, so some details may be different if you are using another version.
VRM 0.X Settings
With the VRM addon installed, go to Sidebar in the VRM tab, we have already covered some settings in past tutorials, but we will review and learn new settings throughout the tutorial. In Blender, we can switch between the settings of the different VRM versions while still using the same model, which makes our workflow easier, as it is not necessary to create another Blender file or another model. Version 0.X will be replaced by 1.0 in the future, but we don't need to worry too much about this as many applications still use version 0.X and the replacement should be gradual. To learn more about the changes from VRM 0.x to 1.0, read VRM-1.0 Changes - VRM documentation. Let's focus on VRM 0.X first.
Operator
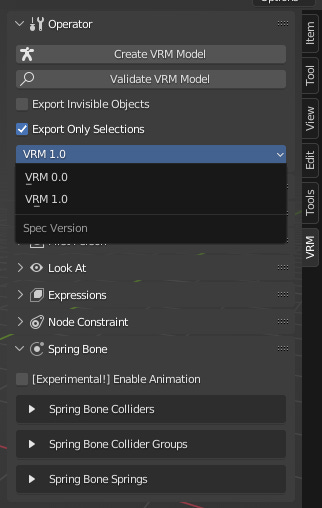
In this panel we have the 'Create VRM Model' button that will generate a new simple armature along with some basic VRM settings. The other button, 'Validate VRM Model' will check whether the model is ready to be exported, if not, some error messages or warnings will appear with suggestions on how to correct the problem. When ‘Export Only Selections’ is enabled only selected models are checked or exported, otherwise all visible models can be checked and selected at the same time, even if they are not selected. When ‘Export Invisible Objects’ is enabled, models with Viewport disabled can be checked and exported. In the case of a modular model, I suggest that 'Export Only Selections' is enabled and 'Export Invisible Objects' disabled for greater control over what will be checked or exported. Further down we have a drop-down list with the options 'VRM 0.0' and 'VRM 1.0', with which we can switch the settings of the two types of VRM.
VRM 0.x Meta
Contains model metadata, information such as title, version, author, license, etc. If you want to create an original character from one of the templates, I suggest saving it in a separate file to start your customization. When updating the metadata, I suggest you read Model Information - VRM documentation for better understanding. In the Quick VRM Edit in Blender tutorial we talk about how to create and load a new Thumbnail, feel free to load the image you want, it can be a render made in Blender or an illustration in external software.

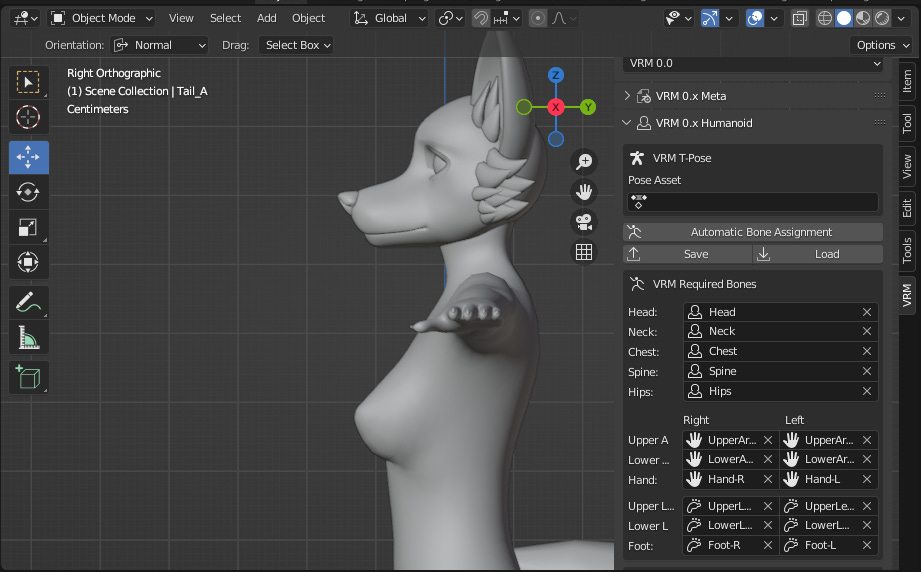
VRM 0.x Humanoid
Where the bone configurations are located. The first field is 'VRM T-Pose', as our model is already in the T-Pose by default it is not necessary to fill it in, if the model was in the A-Pose as the initial pose, for example, it would be necessary to create a T-pose as a Pose Asset (not to be confused with Library Pose Legacy). Then the 'Automatic Bone Assignment' button, when clicked, the mandatory and optional bones will be automatically assigned in their respective fields, based on the names. The set of mandatory bones are all those necessary for the basic movements of a VRM model, such as movements of the head, trunk, waist, arms and legs, while the optional bones are those that allow more varied movements, such as those of the fingers, shoulders, toes, among others.
Next we have settings similar to Unity's Avatar Muscle & Settings, but specifically to 'Additional Settings'. The Stretch Setting determines how much the joints can stretch when the limbs reach their maximum extension. Twist Settings determine how much the twist of one joint affects its neighbors. Feet Spacing determines the spacing between feet in animations. By default, related bones only support rotations, the Translate DoF option adds translations to the bone movements. Many of these settings are not visible in Blender, but can be tested in Unity (more details in the next tutorial).

You may have noticed that the forearm is segmented into two bones, but only one of the bones (LowerArm-R/L) is mapped. VRM 0.x's bone configurations are based on Unity's Mecanim humanoids and it does not support auxiliary bones for torsion, instead it uses the previously mentioned muscle systems. Even so, the movement of the forearm made by just one bone is not as realistic, even with the joint twisting of neighboring bones to compensate.
You can see in the video below how the structure of the forearm bones allows it to rotate with greater independence in relation to the arm.
Although in our model the 'LowerArm_twist-R/L' and 'LowerArm-R/L' bones that make up the forearm are not the same as in the video, that is, parallel to each other, we can reproduce the effect in a similar way by distributing the rotation between them and their neighbors, let's see in more detail in Node Constraints of VRM 1.0.
Even if 'LowerArm_twist-R/L' is not mapped, as it is related to 'LowerArm-R/L', in practice they will act as a single bone in a VRM 0.x model.
VRM 0.x Blend Shape Proxy
In this panel we can create (in principle) facial expressions by combining different shape keys/blend shapes, gathered in Blend Shape Groups (or BlendShape clips). There are predefined Clips in a pair of Name and Preset, and Presets correspond to standard VRM expressions, I recommend configuring them all and not deleting them or leaving them blank, as many applications that support VRM models use these predefined Clips as default and some do not support custom Clips. Custom clips have the Preset set to 'Unknow', it is recommended not to set them with a standard Preset as it can cause confusion when one of these needs to be loaded.
The ‘Is Binary’ option causes the clip value to be 0.00 or 1.00, with no intermediate values. In Materials Values you can add a varied color effect to one or more materials to operate in conjunction with a clip, for example to create an effect to make the character's face reddish in an angry expression or bluish when scared. So far I don't think it's possible to reproduce it in Blender, but in the next tutorial I will exemplify it in Unity.
Some Clips use ears to emphasize facial expressions, if you want to use another ear in your model, don't forget to change them in the corresponding 'Binds'. For example, the clip 'Joy' uses the object 'CanineEar_A_1' with the shape key 'Ear Joy', if you want to use the ear 'CanineEar_B_1', you must replace the old mesh object with the new one in all instances. As the shape keys have the same name they will be automatically assimilated, otherwise the input field will be marked red indicating that the specific shape key is not found in the current object.
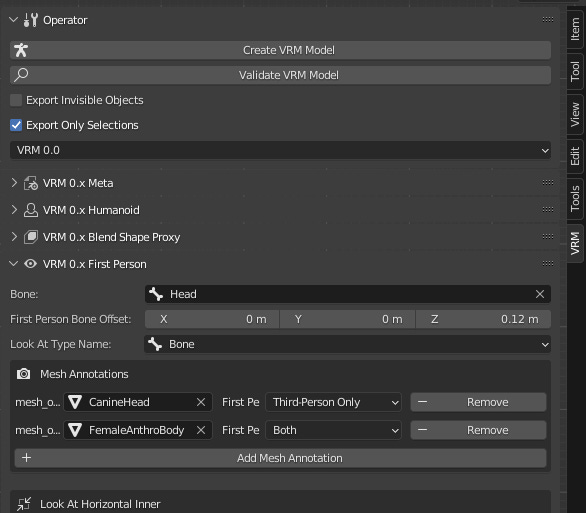
VRM 0.x First Person
These are the settings for how the model should work in a first-person mode, most common in VR spaces such as Cluster and VirtualCast. First the reference bone, in this case ‘Head’, to define the position of the FirstPerson Camera from the origin of the bone. Below, in ‘First Person Bone Offset’, the relative position that such a camera should be in, in this case something like eye height. In 'Look at Type Name' it defines the type of eye movement, in our case through bones, but it could be through blend shapes if they had something related to orbital movements of the eyes (in this case we would have to configure these blend shapes in 'Blend Shape Proxy' in the LookUp, LookDown, LookLeft and LookRight presets). In 'Mesh Annotations' it will be defined how the model's meshes will be rendered for each type of camera, being ThirdPersonOnly, FirstPersonOnly, Booth or Auto.
It is recommended to divide the mesh into head and body when creating the model, in our case the template model already meets this specification. The head must be specified as ThirdPersonOnly and the body as Booth. In automatic specification (Auto) the mesh is divided based on the influence weight of the bones, this process is heavier, so prefer the other options.
Further down we have ‘Look At …’, parameters that define the movement of the eye through degree mapping.
Maximum Yaw and Pitch angle ➤ ‘Curve X Range Degree’
EyeBone rotation angle (right and left) when the yaw and pitch angle is at maximum ➤ ‘Curve Y Range Degree’
So far, these parameters are only possible to test in Blender on VRM 1.0 settings, along with Spring Bones, which we will cover later.

VRM 0.x Spring Bone Groups
They are sets of bones, each with their own configurations. SpringBones are a physics simulation system for hair, clothing and similar meshes influenced by influence weights.

Looking at ‘Ears’ closely as an example, we have:
Comment: defines the name of the set.
Stiffness: influences how much the bone stays in place when the body is in movement. The minimum value makes the bone stay still in its original position, giving the influenced mesh a sagging appearance, while high values make the bone follow the rest of the body more, giving the influenced mesh a firm appearance.
Drag Force: influences how much the bone shakes when the body is in motion. The minimum value makes the bone swing a lot and higher values make it swing less.
Gravity Power: defines how much the bone moves towards gravity. With a value of zero the bone will not be affected by gravity, with higher values the bone is pulled by gravity.
Gravity Direction: Sets the gravity direction of the gravity force. If (Z = 1) => 'up', (Z = -1) => 'down', (X = 1) => 'right', (X = -1) => 'left' , (Y = 1) => 'backward', (y = -1) => 'forward'. The vector axes are relative to ‘World Space’.
By default, Z = -1 to simulate the natural effect of gravity. It is possible to configure directions in X, Y and Z simultaneously, in practice, this could create a floating effect, which would be interesting for characters of supernatural origin, such as ghosts, for example.
Note: these coordinates refer to Blender. In Unity (Y = 1) => 'up', (Y = -1) => 'down', (X = -1) => 'right', (X = 1) => 'left ', (Z = -1) => 'backward', (Z = 1) => 'forward'. VRM models probably use Unity coordinates, however the VRM addon for Blender must do the conversions when importing or exporting so you don't need to worry too much. You should only be careful when configuring your model in a different software.
Center Bone: defines a reference point on the model, usually the ‘Root’ bone. By default, Spring Bones use the World Space origin to calculate their movements, but we can define a bone as a reference point and this new point will follow the model when it moves. In practice, 'Center' prevents the Spring Bones from swaying excessively when the model moves, whether walking or running, for example. The criterion for choosing the bone in 'Center' is to be at the top of the armature hierarchy and cannot be closely related to any Spring Bone.
Hit Radius: this parameter is used to detect bone collisions with Colliders, the greater the radius value, the greater the detection range.
Bones: defines the bones that will be affected by the settings mentioned above. In VRM 0.x, simply select a ‘parent bone’ and the ‘children’ will inherit the settings. In VRM 1.0, spring bones need to be configured individually. Details later.
Collider Groups: defines the group(s) of Colliders that will be used by Spring Bone.

In Collider Groups we have the configurations of Colliders, objects that are used to detect collisions. Looking closely, each group is associated with just one bone in the Armature, which serves as a reference point for its position, the Colliders together form a kind of solid body (in the case of UpperLeg-R, imagine it as if it were the muscles that involve this bone), which in case of contact with certain Spring Bones, they will be repelled, this prevents meshes influenced by Spring Bones from passing through parts of the body.

Each Spring Bone Group can be associated with one or more Collider Groups, the choice of which Collider Groups should be associated with a Spring Bone Group will depend on the size of the set and range of movements of the associated Spring Bones. In the 'Tail' example, collisions are more frequent in regions close to the upperlegs and waist, so Colliders in that region are better choices

In my sample VRM models, you can see that the Colliders do not cover the entire body, such as the lower legs, shoulders, arms and chest for example. The reason for this is that there are no Spring Bones that reach these areas of the body, for example there are no long hairs that could collide with shoulders, arms and chest. There is no such thing as a long dress that can clash with your lower legs. Once you create your own models from the template, more comprehensive Colliders Groups can be added if necessary.
Another observation is that my templates do not have Collider Groups defined, the reason for this is that I personally find it easier to configure them in Unity. Trying to explain it simply, when we create a Collider in Blender it is represented by an Empty Object, these objects have no geometry and generally serve as a reference for configurations. As these objects are created, they are added to the same model scene. Preferably these objects should be organized in a collection, something like ‘Colliders’ for example. The problem is that they are additional objects in the scene, in some cases they must be hidden to facilitate the editing of other objects. Editing the size of these Colliders must be done in the VRM settings and the position in Transform. In Unity, these Colliders are configured as a component associated with the bone, and in the context of a component it is easier to edit it. Another advantage is that we can save these configurations in a JSON file and load it into another model (as long as it has a Similar Armature), in the next tutorial I will go into more detail. But if you want to try configuring Colliders in Blender, feel free. In this case I suggest importing one of my VRM samples into a separate Blender (.blend) file to serve as a reference.
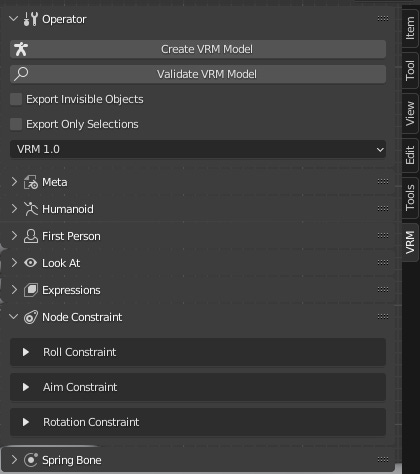
VRM 1.0 Settings
Let's now switch to VRM 1.0, some settings are similar, but let's look at some differences.
Meta
The first two fields are the same as the previous version, but the difference starts with ‘Authors’. In VRM 0.x, if there is more than one author, the names must be filled in on the same line separated by a character such as a comma, slash, backslash, etc. In VRM 1.0 you can remove and add multiple lines, which can make it easier to organize and read author names, as many names on the same line can be confusing.
Above 'Contact Information' (a URL or email to contact the author), we have 'Copyright Information', a URL to an external page containing copyright information, before we had a predefined list in 'License' with the Creative options Commons, 'Redistribution Prohibited' and 'Other' (for other types of license, one created by the author for example). Perhaps this change was made for greater flexibility and ease in defining licenses.

VRM 1.0 also supports multiple references, which are basically links containing information about the character/avatar, if any. It could be an online character sheet, a Wiki page, or some related work, like a game or comic book.
In 'Third Party', if the model is licensed under some type of specific terms of use, for example, assuming that the base model was made in other software such as Fuse, and later edited in Blender, probably some link referring to licensing of the model would have to be inserted in this field.
Below we have slightly more detailed types of permissions than before, with emphasis on 'Credit Notation', 'Modification' and 'Allow Redistribution', these definitions were implied by the predefined Creative Commons or other customized licenses. This change must have been made to facilitate the end user's understanding of these definitions, since it was necessary to consult external pages and they are now explicit in the model.
In 'Other License URL', in VRM 0.x, if the 'Other' option was selected in 'Licence', a URL of a license that was not Creative Commons (or an additional one if it was) must be inserted. In the case of VRM 1.0, this field must be considered optional for an additional license, as the main license must be explicit in 'Copyright Information'.
Humanoid
It's similar to the previous one, but with some differences, there are no longer extra settings for legs and arms such as Stretch and Twist, and the Translate DoF option has also been removed. Instead we have ‘Allow Non-Humanoid Rig’. So far I haven't found anything about it in the official VRM documentation, or on the GitHub page of the VRM addon for Blender, but as described it seems to be aimed at non-bipedal characters, which is not the case with the models in the Anthro Canine Female/Male templates. I suggest leaving it unchecked, but it's a point I thought would be interesting to mention, as perhaps VRM could have compatibility for quadruped characters in the future.

First Person
It’s similar to the previous one, but you may have noticed that it is smaller, this is because the other options are now separated into 'Look At' as another panel.

Look At
We now have ‘Preview Target’, an object in the scene that we can use to test eye movements, to visualize the movements ‘Enable Preview’ must be enabled and ‘Play Animation’ must be active. The difference between moving the bones with this feature instead of using a bone as a target (EyeTrack), is that by doing the former it is possible to visualize the effects of the 'Range Map' settings. Still talking about 'Range Map', the degree map curve (option that controls the smoothing of movement through curve parameters) was removed, making adjustments more simplified.
Expressions
It replaces ‘Blend Shape Proxy’. The first difference is a change in the nomenclature of some predefined Blendshape Clips, for example ‘Joy’ becomes ‘Happy’, in addition, each clip is now called Expression. Another detail is the 'Override...' options, which will basically define how a given expression A will react when an expression B (from the Blink, Look At or Mouth group) is active at the same time. B expressions are procedural, they are automatically generated by the application.
The settings in ‘Override…’ are:
None: nothing happens, the value of expression B remains the same.
Block: when the value of expression A is greater than zero, expression B is equal to zero.
Blend: the value of expression B is defined as Value.B = (1 - Value.A). In practice, this automatically balances expressions A and B.

Continuing, 'Material Color Binds' replaces 'Material Values', but in practice it has the same function, further down we have 'Texture Transform Binds' which modifies how the texture of the selected material is displayed on the mesh during the execution of the expression through the parameters ' scale' and 'offset'. Both do not have a preview in Blender at the moment.

Node Constraints: has Roll, Aim and Rotation Constraint settings that replace Translate DoF, Twist, Strech and Feet Spacing in the ‘Humanoid’ panel. While the previous ones were based on Unity's Avatar Muscle & Settings, which, although easy to configure, had their limitations, Node Constraints are more customizable and allow you to simulate leg and arm movements in a more complex and realistic way.
To create VRM Node Constraints in Blender, simply create a Bone Constraint that meets the conditions of one of the nodes, for example, when one of Blender's Bone Constraints follows the Roll Constraint conditions, it is automatically listed in the Node.

To test the practical effect, leave the 'Copy Rotation' of the bones, 'LowerArm_twist-R', 'LowerArm-R', 'UpperArm-R' and 'Shoulder-R' disabled for a moment, and rotate the 'Hand-R' bone at Y = 90º (XYZ Euler). The deformation of the forearm in relation to the hand does not appear natural.

Now activate 'Copy Rotation' of each of the bones again, set the 'Hand-R' rotation to Y = 50º (remembering that the 'Copy Rotation' influence of 'LowerArm_twist-R' = 0.35, 'LowerArm-R' = 0.25 'UpperArm-R' = 0.25 and 'Shoulder-R' = 0.5), compared to the previous example, the rotation of the hand in relation to the rest of the arm appears more natural, this is because the bones of the arm rotate together, to different degrees depending on the parties and the influence of the 'bone constraint'.

It is worth noting that this was just an example, the configurations tested may not be the most suitable, as it is not easy to reproduce the movements of the humanoid body realistically in a 3D model, in some models it is common to use extra bones to obtain better deformations with the mesh, for example on the VRM1 Constraint Twist Sample page, on the VRM Consortium's GitHub, we have an example model with the Roll and Aim constraints. You can download and import it into Blender, when viewing the armature, you may notice additional bones in the arms, these will help with more realistic arm movements. Test the movements in Blender and, if possible, also test in an application that supports VRM 1.0. For more information about Node Constraints, read VRMC_node_constraint.

Spring Bones
It’s similar to the previous one but with some differences. In Colliders, now each Collider is created separately and then linked to some group. In addition to 'Radius', which determines the size of the Collider, we now have 'Offset' where we can determine the position of the Collider, previously only using Blender's Transform.
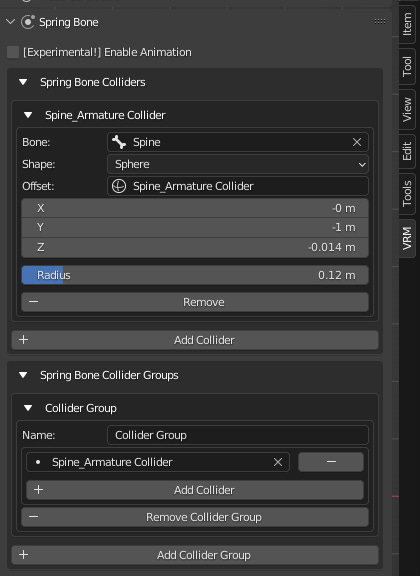
Another additional one is 'Shape' where in addition to 'Sphere' we now have 'Capsule', the advantage of the second over the first is that in cylindrical body parts such as legs and arms we do not need to create several spheres to fill the limbs in order to detect collisions , instead a composite Collider is used, 'Head'(starting point) and 'Tail'(end point), each with their own positions. The interval between positions must form the length of the member.

Later we have the Spring Bones Springs settings, similar to the Spring Bones Group but with a significant difference, before the settings assigned to a Parent Bone affected all Child Bones, but now all bones within the set need to be configured manually.
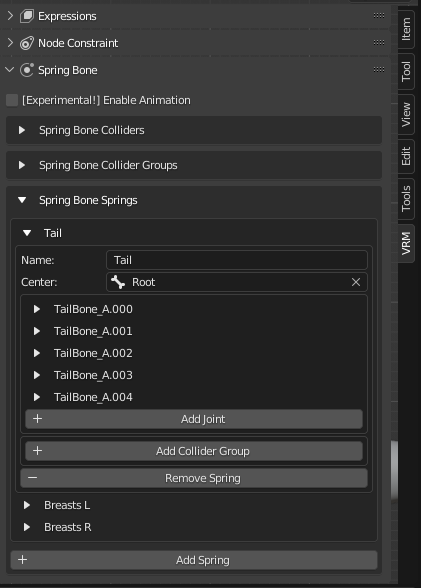

The likely reason for this change is the possibility of creating more complex physics-generated movements, for example, the parent bone could be stiffer and the children gradually more flexible.
Another difference is the 'Enable Animation' option, where you can view the movements of the Spring Bones when 'Play Animation' is active. In the example below, the breast and tail bones swing when I move the model from the 'Hips' bone (remembering that this model is using Blender's inverse kinetics, so the body movements could be different if tested in another application), feel free to test with other values in the Spring Bones settings.
Another observation is that if you try to reproduce the test by making the movements from the 'Root' bone, the effects of the Spring Bones will not be visible, this is because 'Root' is set to 'Center' in the Spring Bones settings.

VRM Materials
Lastly, let's review VRM Materials. When we create a new material in Blender, it is configured as a simple Principle BSDF node, this can be configured in the Surface panel in 'Material Properties' or in the 'Shader Editor' of the Shading Workspace.


However, we should use the material VRM panel instead of Surface. Note that there is a warning on how to export the material in VRM format. Don’t worry too much about the details, because when you enable ‘VRM Mtoon Material’, most of the requirements will be configured automatically.

Once enabled, more settings will appear, note that in the 'Shader Editor' new nodes were automatically generated, it is not necessary to edit them in this editor, I suggest you just configure them in 'Material Properties'.


Let's look at some basic settings.
Alpha mode: defines whether the material is opaque or translucent.
Opaque: has solid colors, without any transparency.
Cutoff: although it is opaque, it refers to the alpha value information of Lit Color, Alpha and ignores the drawing of areas smaller than the Cutoff value.
Transparent: It is semi-transparent. The opacity will be according to the Lit Color alpha value, Alpha. The disadvantage is that the contour drawing is not done correctly.
Double Sided: if enabled, the front and back of the mesh is rendered, otherwise only the front.
Lit Color, Alpha: defines the color of the material when it is reflected in light. It can be a base color or a texture map. We can use HSV, RGB or HEX color standards, I recommend using HSV for texture maps. With V (value) = 1,000 , the texture remains at 100% of its luminosity, basically its original color. In A (alpha) we define the transparency level of the material, with 1.0 being opaque and 0.0 being completely transparent.
Shade Color: defines the color of the material when it is not reflected in light. It has the same Lit Color settings, except Alpha. In the HSV standard, the Value difference between Lit and Shade Color will generate the shading effect, if the difference (Lit - Shade) is low, something like 0.2, the shading will be smooth, but if it is high, something like 0.80, the shading will be strong.
Normal Map: defines the normal map, which contains additional details to the surface of the mesh, making it appear more detailed without adding additional polygons to its geometry. Scale defines the level of influence of the normals, the larger the details are, the smaller the details are, the smoother they are.
Shading Toony: defines the sharpness of the shading, with the maximum value at 1.0 the shading becomes sharper, ideal for a more cartoonish look, with lower values the shading becomes more blurred.
Shading Shift: defines the amplitude of the shadows. The smaller the value, the greater the amplitude.
Outline Width Mode: defines the type of outline of the material.
None: does not draw contours.
World Coordinates: draws a constant width contour for the world (scene in which the 3D model is present). In practice, the contour appears thicker when viewed up close and thinner when viewed from a distance, this is because the contour is relative to the scene.
Screen Coordinates: draws a constant width outline for the screen. In practice, the contour appears thinner when viewed up close and thicker when viewed from a distance, this is because the contour is relative to the screen. In Blender, visualization of this effect has not yet been implemented in the VRM addon (at least until version 2.20.25), instead the visualization is the same as 'World Coordinates'. This effect will only be visible after exported and loaded into other software such as Unity or VseeFace.
Outline Width: defines the width of the outline in numerical values. There is also an input field for the image, in this case an ambient occlusion map, in this context this map will help in drawing the contours.
Export Shape Key Normals: for meshes that use Shape Keys and normal maps, it is recommended that this option is checked, when unchecked, after exporting the model, the meshes may present visualization problems when some Shape Keys are used, especially those with movements more expressive, such as mouth movements for example, it is as if the mesh lost its coordinates in relation to its normal map. With this option enabled, the coordinates of the meshes in relation to their normal maps appear to be maintained after deformations using Shape Keys.

For more details read MToon settings in VRM documentation.
VRM export
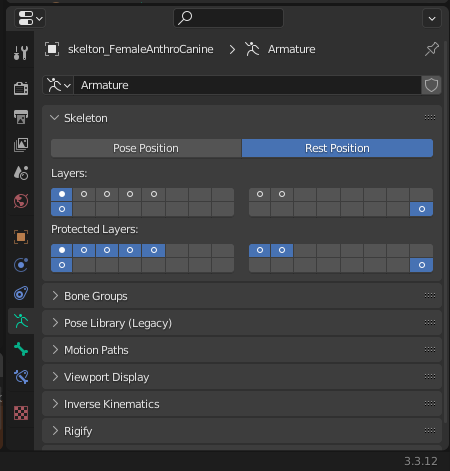
Now with all the settings ready, let's make preparations for exporting the model. First use the 'Clear User Transforms' command in 'Pose Mode' to ensure that there are no transformations on the bones before exporting, in addition, leave Skeleton in 'Rest Position', this way all transformations on the bones made by both the user and constraints are blocked.
Still in the same panel, to make things easier, first select 'Layers' of the bones you don't want to export and delete them in 'Edit Mode' (remember to save the project before that). If you have questions about the template's layers and bones, I recommend reviewing the previous tutorial, there are more details about each layer.

Now that we've resolved the Armature, let's adjust the mesh. First choose an outfit, for each model, only Outfit and AthleticWear/Underwear are currently available. After choosing, we will cut the body mesh, the reason for this is to erase non-visible and unnecessary vertices that will be covered by the clothing. To cut, we go to ‘Edit Mode’, we can use the Mask modifier to help us, with it it is possible to preview the cut through a vertex group specific to each garment.

After choosing the vertex group, we select it under ‘Vertex Groups’. Note that ‘Select Mode’ is in ‘Vertex’ now, I recommend leaving it in this mode before erasing the selection.

Now that we have done the cropping, let's go back to 'Object Mode', remove all modifiers except 'Armature' and 'MToon Outline...' for each object to be exported. In the case of ‘CanineNose’, apply the ‘Subdivision’ or ‘CorrectiveSmooth’ modifier.

After performing the previous steps, select all objects to be exported and click on ‘Validate VRM Model‘.

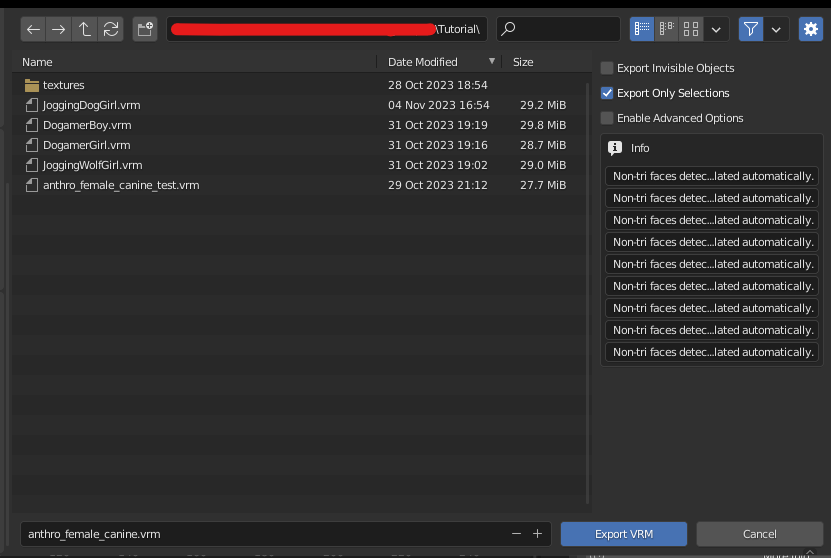
A message like this should appear. There are no errors, which is a good sign, just a few warnings, these inform that the faces of the model's meshes are not triangular (in this case they are mostly quads), but they will be triangulated when exported, so there is nothing to worry about. worry.

After everything is in order, we can now export. Go to ‘File > Export > VRM’. Choose the name and directory where the file will be saved.
We exported the model in VRM 0.x format, if you want to export to VRM 1.0 just go to the 'Operator' panel and change the version, so all VRM 0.x settings will be exchanged for 1.0, remembering that we can freely switch between versions , without one harming the other. Now just repeat the same previous steps, validate the model and then export.
After exporting, you can import the VRM file into Blender and review it. Open a new file and go to ‘File > Import > VRM’. Review all the data, see if there are any inconsistencies or anything wrong. If you feel the need to change something, be it metadata such as the Model name, contact information, permissions, etc., or change values in the Expressions/Blend Shape Proxy settings, feel free, you can also change settings in Materials, change textures or even model meshes, in this case I recommend you read the tutorial Replacing VRM model mesh in Blender for more details. If you want to make a lot of changes, but don't feel the need to repeat all the steps done in the template, I suggest you save the imported model in another Blender file to finish the edits more calmly, otherwise you can simply export and overwrite the model, no need to save it to a Blender file. Import it again into Blender and see if the changes were successful.

After the review, test it on an application that supports VRM, such as Vseeface or XR Animator. (Note: VseeFace only supports VRM 0.x).


Conclusion
And that's it for today! In this tutorial we learn how to configure a model and export a VRM model from a template in Blender. In the next tutorial we will do the same from Unity. To the next!
Extra
Mecanim humanoids | Unity Blog
Pitch, yaw, and roll - Simple English Wikipedia, the free encyclopedia
World Space and Local Space - CG Cookie
[Tutorial] Springbones: How to add physics to bones [VRM]
Reference
BlendShape Setting - VRM documentation
HumanoidComponent - VRM documentation
VRMFirstPerson - VRM documentation
VRMSpringBone - VRM documentation
VRM-1.0 Changes - VRM documentation
Configuring Expression - VRM documentation
Constraints - Introduction — Blender Manual
Inverse Kinematics (IK) - Introduction — Blender Manual
Manual: Avatar Muscle & Settings tab