Quick VRM Edit in Blender
A beginner VRM tutorial
Hello reader, welcome! In the previous tutorial we made a small modification to a VRM model using Unity. Now let's do the same using Blender. If you haven't used it yet, download and install Blender. After installation, open the program, you will see a home screen similar to the image below.
Getting Started
For beginners in Blender, a small Introduction. Use the T hotkey to show/hide the Toolbar, it contains tools to select or manipulate an object in the current workspace. Use hotkey N to show/hide the Sidebar, containing properties and settings of the last selected object. For more details on the Blender interface, take a look at Regions and Areas in the Blender Manual.
Before proceeding, you need to download the VRM Add-on for Blender. Upon download you will find a compressed file. To install, go to Blender's top panel, Edit > Preferences > Add-ons.
Then click on ‘Install’, select the compressed file and click on ‘Install Add-on’.
Again under ‘Add-ons’, make sure ‘Community’ is enabled. Go to the search box in the top right corner and type ‘VRM’, to make it easier to see the add-on we want to install, enable the add-on and it will be ready to use. Furthermore, we can change some settings in ‘Preferences’, I recommend disabling ‘Set shading to “Material”’ in ‘Import’ so that the model loads faster during import. You can close the ‘Blender Preferences’ window (by default, ‘Auto-Save Preferences’ is enabled, you can check it by clicking on the three-bar menu in the bottom left corner of this window).
Now in the main window, top panel, top left corner, go to File > Import > VRM. Select a VRM file, in our case we can choose one of my samples, it could be ‘anthro_female_bordercollie.vrm’. When trying to import the model you are likely to come across this message in the image below. As you can see, it asks you to check the model's license before you start editing it. When you click on 'Open' you will be directed to a web page with the model's license information, in this case CC-BY. Checking the license is an optional step but highly recommended, after being sure about the license, enable 'Import Anyway' and click 'OK' to proceed with the import.
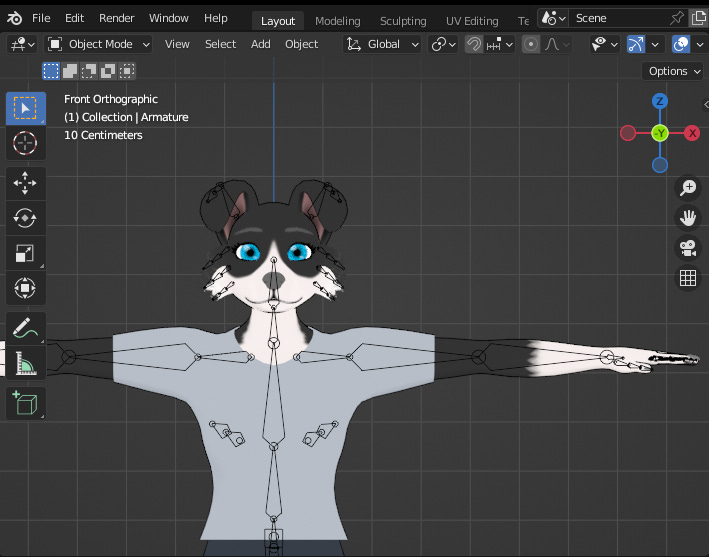
In the initial workspace (Layout) you may have noticed some differences with the model from the previous tutorial, the armature is now visible. In Unity you can manipulate bones/joints by selecting them within the model hierarchy, however, such components are not visible in the scene. You can make them visible with some extra settings or through add-ons like Unity Asset Store's Pose Editor.

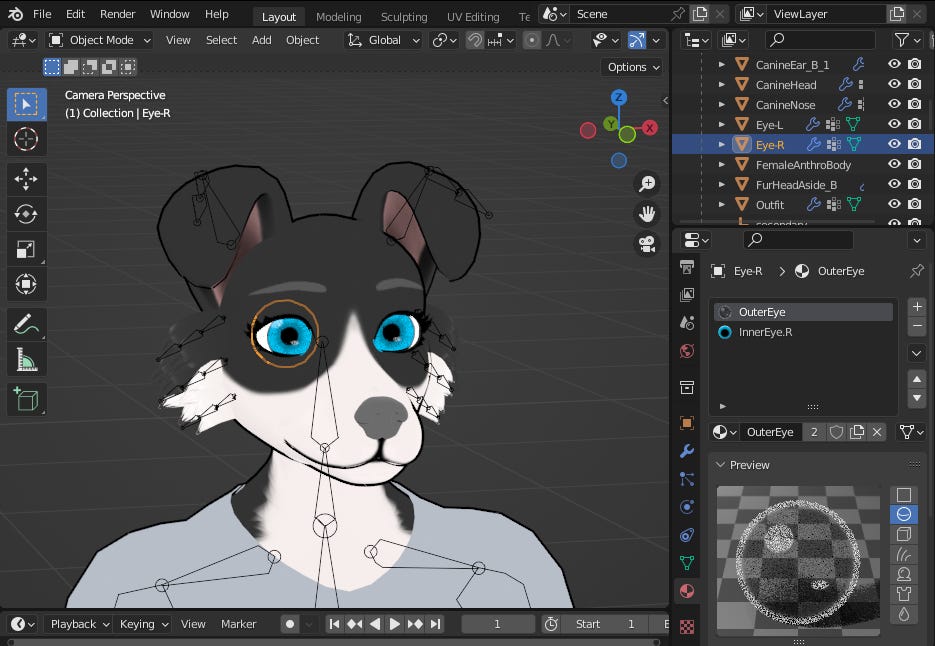
In the ‘Viewport Shading’ in Header, right corner, toggle between Material Preview and Rendered.
Note that the nose and eyebrow colors look a little different when viewing our model in Unity or VseeFace (Take note of this detail, I'll explore it later).
Now go to Outliner, area in the top right corner, you will notice that it is similar to Unity's Hierarchy, select Armature, then in Header, left corner, switch 'Object Mode' to 'Pose mode'.
In Pose mode, select the Shoulder-L and Shoulder-R bones and set the rotation value to X: -0.100 (remembering that the rotation is in Quaternion WXYZ mode), then select UpperArm-R and UpperArm-L set the rotation in X: -0.500. The model should look like the image, with the body in a relaxed pose, a more natural look compared to the T-Pose.
I suggest you save before proceeding (tip go to ‘Viewport Shading’ and switch to ‘Solid’ before saving, the file will load faster when opening again). Go to ‘File > Save as…’, select a location, it can be the same as the VRM file, define a name and save.
Now switch ‘Pose Mode’ to ‘Object Mode, select the Camera, set Transform in ‘Object Properties’ as in the image below.
Now in Object Data Properties (Camera Icon) set the values in Lens and Viewport Display, as in the image below.
In ‘Output Properties’ set Format as in the image below.
Lastly in ‘Render Properties’ in ‘Film’ enable Transparent. This will make the rendered image have a transparent background. This could be interesting if you want to create a custom background in an external application, for example.
As an optional step before rendering, let's create a new light source, let's choose Sun.
Select Sun in Outliner and in 'Object Properties', set the values in Transform as in the image. Additionally, disable the rendering and preview of the ‘Light’ object by clicking the camera and eye icon on the same line in Outliner.
Now, with the scene selected, press 0 on the NumPad. This will switch you to the camera view. See if in your case it looks like the image below. If your keyboard doesn't have a numpad, try this solution in Configuring Peripherals — Blender Manual.
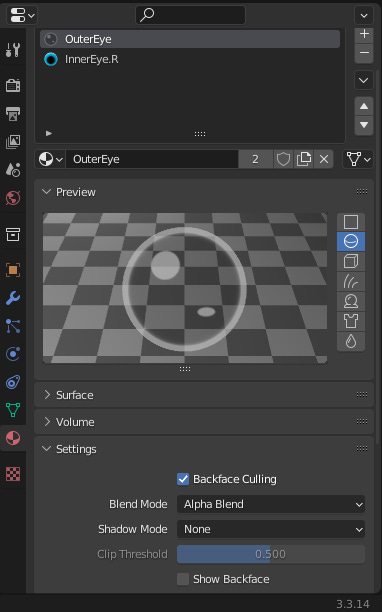
Before rendering, some details. Switch the Viewport Shading to ‘Material Preview’ or ‘Rendered’. Select one of the eyes and see the preview of 'OuterEye' in Material Properties (remembering that each Mesh can have more than one material), notice that the transparent material is a little cloudy.
A little further down in Settings change the Blend Mode from ‘Alpha Hashed’ to ‘Alpha Blend’. You will notice that the appearance of the outside of your eyes has improved. One of the possible reasons that the imported file loads with some lower quality material settings might be to load faster, but I'm not sure.
We will also change the texture of the character's clothing. As the female model's 'Outfit' object has a similar UV Map to the male model, we can reuse common textures, such as the one used in the previous tutorial. If you didn't follow the previous tutorial, download this vector drawing, edit it if you want the application of your choice and export it in png format. Save the new texture in a folder close to the .blend file of the current project, I suggest you create a folder called 'textures' in the same directory as the project, later on you will understand.
With ‘Outfit’ selected, in ‘VRM Material’ in the ‘Lighting’ box, change the Lit and Shade Color texture, loading a new one by clicking on ‘Open’ (folder-shaped icon).
As in the image now you will notice that the appearance of our model's clothes has changed a little.
Now go to the top left panel, select Render > ‘Render Image’ or press F12.
The rendered image will appear in a separate window. Go to Image > ‘Save As…‘, define a name, it could be ‘DogamerGirl-Thumbnail’, you can save in ‘textures’.
It is important to note that the appearance of the model, more specifically that of the material, was not as identical as that seen in Unity. One possible reason is that Unity and Blender Shaders do not work the same way and that the VRM Add-on for Blender only tries to simulate the look of the MToon Shader in Blender. This does not prevent a VRM model from being made just using Blender, but certain configurations may be easier to make and test in Unity. It is worth mentioning that many applications that support VRM were developed in Unity and that UniVRM is the standard implementation of VRM.
For example if you select a part of our model and then 'Material Properties' and in 'VRM Material' (below Settings), in the 'Outline' section you will notice that 'Screen coordinates' has not yet been implemented (until version 2.20 .12 of this add-on) and that 'World Coordinates' becomes active instead.
Another example is that so far, it is not possible to test 'SpringBones' with VRM 0.x (a system that simulates the physics of fabrics, hair and the like) in Blender only with VRM 1.0, in Unity we can test with both. There are Plugins for other game engines like Unreal and Godot, but so far I haven't tested them and I can't really say if they have all the features that UniVRM offers. Maybe in the future I can do tutorials using other engines besides Unity.
Returning to our project, let's take a look at the Sidebar, in the last tab of the panel (the order may be a little different for you), you will see some VRM tools and settings. You may notice that our model is configured for VRM 0.x, we will talk about VRM 1.0 another time.
There are several different settings but let's focus on Meta first. As you can see, a panel similar to what we saw in Unity in the previous tutorial, take advantage and we will change some fields in this model in a similar way to what we did in its male version, if you have any questions on how to fill it out, I recommend you read Model Information - VRM documentation.
In ‘Title’ we can change ‘Anthro Female Border Collie’ to ‘Dogamer Girl’ (or whatever you prefer). In ‘Version’ we can leave it as 1.0, for more details about versioning read ‘Introduction to Semantic Versioning’, although the article focuses more on software versioning I think the same can be applied to VRM models.
Remembering that the sample model is licensed as CC BY, this means that the original author (in this case me) plus their contacts must be cited in a derivative work. In ‘Author’, according to the VRM documentation, the name of the model author is not limited to just one, and the name of the first author is recommended at the front.
In ‘Contact Information’ the URL or email of the first author must remain. In the 'Reference' field, the avatar's original/related works (URL), if any. In this case, it could be your link to a page related to your avatar, for example a profile page, a channel, etc.
In ‘Personation’, it describes ‘who’ and ‘what’ you can do with that avatar. If it is just for your personal use I suggest changing it to 'Author Only' or 'Authorized only for explicitly specified person', in the latter I suggest explaining in an external link the authorized person(s) in 'Other Permissions' or 'Reference' . The types of avatar performance, violence or sexual, are at your discretion, the same goes for commercial use.
Choose a license type, if it is for personal use, I suggest you change 'Licence Type' to 'Redistribution Prohibited' or 'Other', in this case define a URL with its own page explaining your license and its own terms. It could be a character/avatar sheet explaining who the author is and who can use it.
After changing the data, we will update the model thumbnail as well. If we click on the image we will only have image slots loaded with the model as an option.
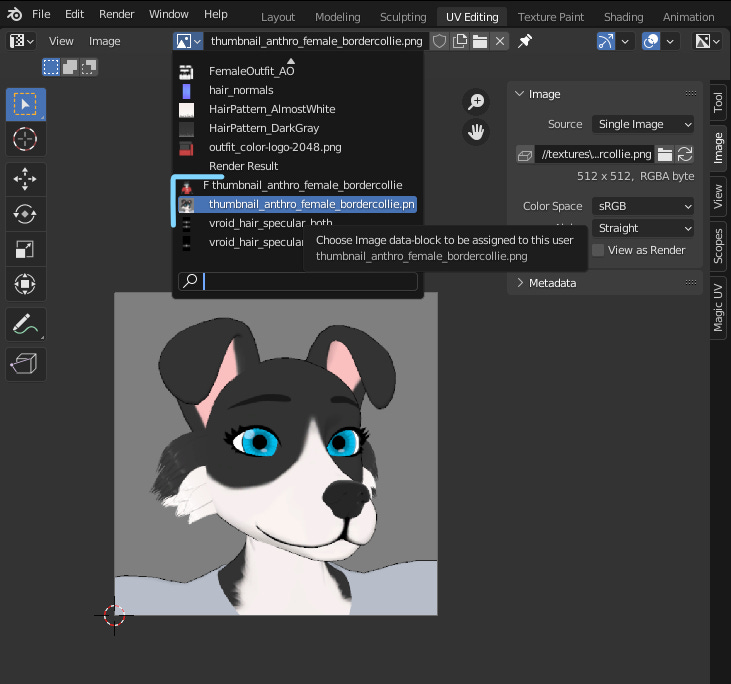
To add the new thumb that we rendered before, we can simply load a new image, in a similar way to what we did with 'Outfit' but let's do the following: In the top panel, go to the UV editing tab, you will notice that the workspace layout has changed, each tab has a different layout depending on the editing context. Go to UV editor (the window on the left), click on the image icon and select the current thumbnail.
Select ‘Unpack Item’ > ‘Use files in current directory (create when necessary)’. A folder called 'textures' would be created in the same directory as our .blend file, but as we have already created it before, the existing folder will be reused, the same goes for the final file. In this folder there will be our old unzipped thumb, for more details, read Packed Data — Blender Manual.
Then press N and a sidebar with the image properties will appear on the right side. Go to the Image tab, click on ‘Browse Image’ (folder-shaped icon) next to the file path, upload the new thumbnail. If you go back to Layout (home screen) you will notice that the thumbnail has already been updated.
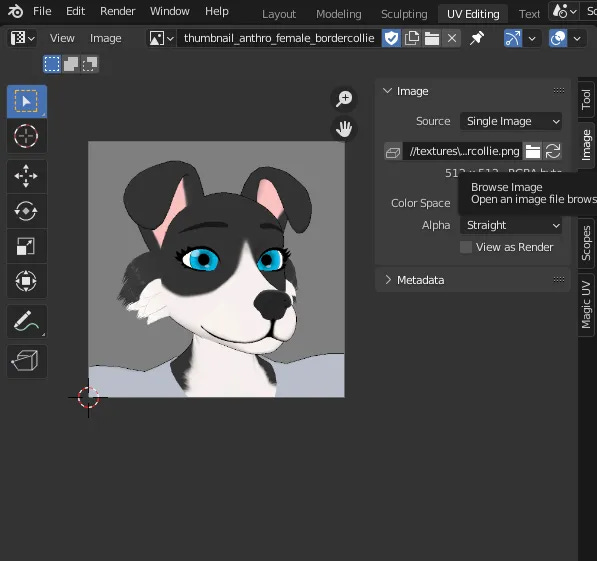
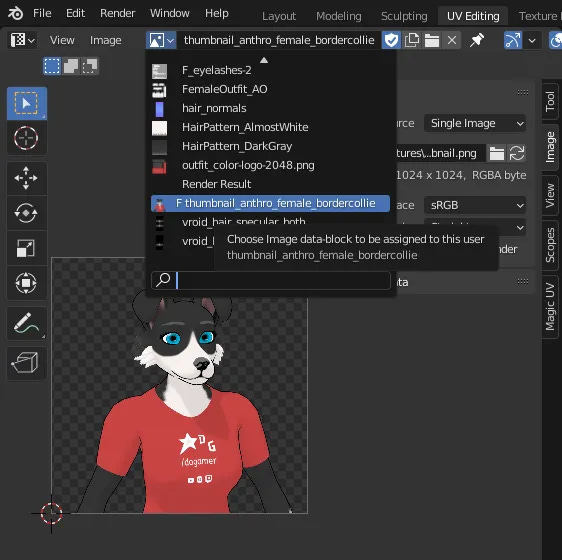
Another alternative, still in UV, would be to go to the Header and Image > ‘Open…’ or ‘Open Image’ next to the current image slot.
However, this would create another image slot, as in the example below. As the objective was to replace one image with another, it would be more interesting to take advantage of the existing slot instead of creating a new one, but it's up to you which approach to choose.
Returning to the main scene (Layout), select Armature, in Header change from ‘Object Mode’ to ‘Pose Mode’. Press 'A' to select all bones, then press 'W', within the 'Context Menu' (this menu will vary according to the selected object and mode), choose Clear User Transform, the last option. This will cause the transformations applied in Pose Mode by the user to be reset to their initial values.
Now let's export our model again. First as a tip, with Armature selected, in Object Data Properties (Running Person) select Rest Position in Skeleton. If you try to move the bones in Pose Mode now, the following error message will appear: “Cannot change Pose when 'Rest Position' is enabled”. It would be a prevention so that we don't accidentally change the initial pose before exporting. If we want to test some poses, just select Pose Position again.
Now select the entire model (tip: disable the visualization of other objects in Outliner, so you won't accidentally select unrelated objects), you can use the Select Box, just drag and drop. Then click on ‘Validate VRM Model’. Observe whether any error messages or warnings appear. In my case (and probably in yours too) the following warning message: ‘It is recommended to set "sRGB" to "Input Color Space" for "canine_nose_AO" in Material "Nose" ’. Some settings used in the ‘Nose’ material were very experimental, I wanted to give a wet surface appearance like that of a dog’s nose (or other similar animal).
Continuing, assuming that there is no error message and that all parts of the model have been selected, go to TopBar, select 'File > Export > VRM', save as 'DogamerGirl.vrm' whatever name you prefer. It may be in the same folder as DogamerBoy.
Now open an application that supports VRM, like VseeFace for example, load the new model by clicking on ‘Add avatar’. Select your camera device and then start with the new model.
Take advantage and test your model using facial capture or hotkeys.
Conclusion
This is the end of our tutorial. As you may have noticed, it was not possible to go through the ‘ABC’ of Blender in a single tutorial and we did not explore all of the VRM settings. This tutorial and the previous one are intended to be introductory for users who are not familiar with 3D models and related software, but who are interested in using the models as VRM avatars with some customization. Although we only changed the thumbnail and image texture of the outfit, the same procedures could be done to replace other textures on the model. In the next tutorials I intend to present more customizations and more configuration details, however, at least basic knowledge of Blender will be required as a prerequisite.
Extras
BLENDER BASICS: An introduction to Blender - CG Cookie
ArtStation - Hair With Curves - Blender Tutoria
Texture Maps Explained | Poliigon Help Center
VRM4U - Runtime VRM loader for UnrealEngine


