Quick VRM Edit in Unity
A beginner VRM tutorial
Hello reader, welcome! Let's say you just downloaded some of my VRM samples or from someone else and you want to customize it but you don't understand anything about 3D modeling, much less texture painting, no problem! This tutorial is for anyone who wants to immediately use an avatar to create content for the internet or for personal use without needing to learn many concepts, so let's go.
Getting Started
Let's use a Unity project for this. If you have never used it, download and install Unity Hub. After installation, open the program and go to Installs in the left corner, here you can manage your unity installations of different versions.
Then click on ‘Install Editor’ in the right corner. Choose a version, preferably LTS (Long Term Support), they tend to be more stable.
Now we go to ‘Projects’ (left corner) and then ‘New project’ (right corner).
Some template options will be presented, we will use ‘3D core’. Check the ‘Editor Version’ at the top for the desired installation if you have more than one installed. Choose a name and location for the project and you're done!
After creating your project, click on it to open. It should look something like this. (You may have noticed that the 'VRM0', 'UniGLTF' and 'VRM1' options in the top menu are not visible in your project. Don't worry, mine is already ahead of schedule, these options will be visible to you after installing UniVRM).
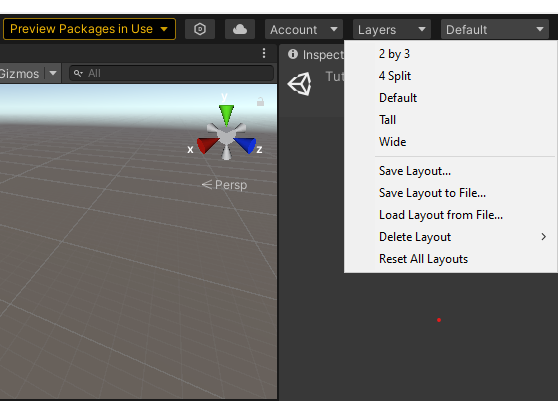
You can change the layout of your project by going to the top right corner and clicking on default, a drop-down list will appear there with other options. I usually use ‘Tall’, I will use it in the rest of the tutorial, but feel free to use whatever you like.
Now let’s install some ‘packages’ for our Unity project. On the official VRM github you will see options to download multiple versions, download a version compatible with your Unity installation. You will also notice two installation packages, ‘VRM 1.0 Import/Export’ and ‘VRM 0.x Import/Export’. You can download and install the packages as ‘Custom Package’ or install via git URL, through UPM (Unity Package Manager).
At the time of writing this tutorial, VRM 0.x is still being replaced by 1.0, however many applications still use VRM 0.x. VMR 0.x can be converted to 1.0 (I will make a tutorial dedicated to this in the future), so in this and the next tutorials I intend to use VRM 0.x. To avoid future problems with compatibility in different applications, it would be interesting to have both formats, 0.x and 1.0 of the same VRM model/avatar. More information in the documentation.
In the example below, in the upper left corner panel, you can go to 'Assets > Import Package > Custom Package'. After clicking on the option, a window will appear to load a ‘.unitypackage’ file. In this case you must upload the downloaded packages.
Another option, which I will use in the example project, is through UPM. In the same top panel but now in ‘Window > Package Manager’.
A new window, similar to the image below, will appear.
Now click on the ‘+’ symbol in the top left corner. A drop-down list will appear. Click on ‘Add package from git URL’, in the input field enter one of the URLs. Example:
https://github.com/vrm-c/UniVRM.git?path=/Assets/VRMShaders#v0.111.0
https://github.com/vrm-c/UniVRM.git?path=/Assets/UniGLTF#v0.111.0
https://github.com/vrm-c/UniVRM.git?path=/Assets/VRM#v0.111.0
https://github.com/vrm-c/UniVRM.git?path=/Assets/VRM10#v0.111.0
After clicking 'add', one of the packages will be installed automatically. Repeat the process until you install the rest.
The reason for choosing this installation method over the other is that installing via UPM is easier to uninstall later. If you want to upgrade your version of UniVRM to a newer version, you will need to uninstall the previous one first. More details in Uninstall UniVRM.
After installation you will notice the options ‘VRM0’, ‘UniGLTF’ and ‘VRM1’ in the top panel in your project. Now let's add a VRM model to our project.
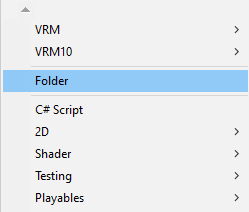
First create a folder inside Assets (all content you create must be in this directory). Go to the ‘Project’ tab and click on ‘+’, a drop-down list will appear, select ‘Folder’. In my case I created a folder called 'Tutorial' and inside this 'DogamerBoy' (this will be the name/nickname of our example character, I recommend naming the folders with the names/nicknames of the characters/avatars for easier identification).
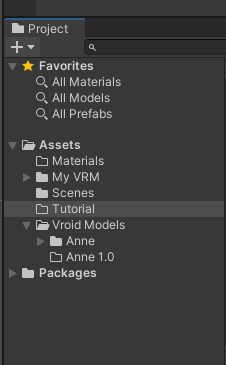
Now let's import our example model. We can simply drag and drop the .VRM file from the example model into the destination directory. Another option is to go to the top panel, select 'VRM0 > Import from VRM 0.x', a window will appear to load the source file (.VRM), after selecting the file, you will be asked for the destination folder, in our case ' DogamerBoy', during this process we can rename the name of the new Prefab from 'anthro_male_bordercollie' to 'DogamerBoy'. In this tutorial I will use this option.
The advantage of using ‘Import from…’ instead of 'drag and drop' is that the generated folders will have the model name at the front, as shown in the example below. Otherwise, in addition to having to rename Prefab, it would also be necessary to rename all manually generated folders.
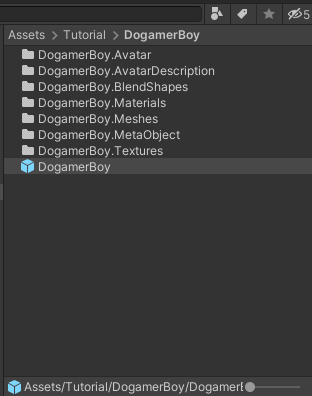
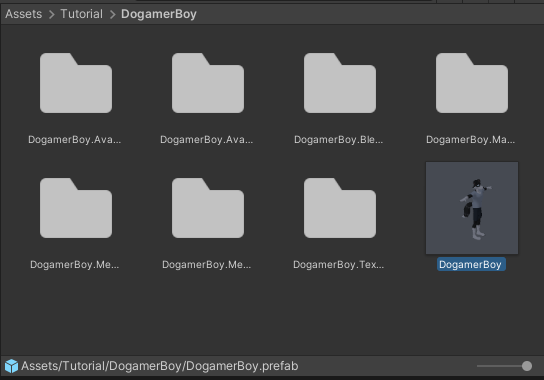
By default, the folders that contain the files necessary to assemble the VRM model have the name of the model at the front, probably for organization and easy identification.
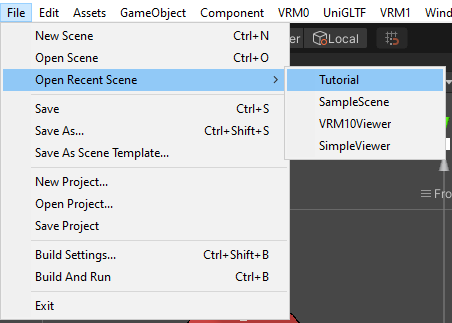
Now let's create an instance of our prefab for the scene. In the 'Hierarchy' tab below the scene name (in my case 'Tutorial', in your case probably 'SampleScene') drag and drop the 'DogamerBoy' Prefab into the scene hierarchy.
Next to the ‘Scene’ tab use the ‘Hand Tool’ (top left corner) to move your view around the model. You can still use the leftmost perspective tool to change the viewing angle and projection. More details in scene view navigation from the Unity Manual.
In our tutorial we will only change the textures of the clothes. If you want to change other textures, feel free. Drag and drop or copy and paste a new image file into the ‘DogamerBoy.Textures’ folder, this file will be the new texture, for more details on read Importing Textures from the Unity Manual. The new texture is very simple, it was made in Corel Vector, it is a vector drawing and will be available for you to download and edit in the tool of your choice.
You may have noticed that nothing has changed in our model, it is still necessary to change some Material settings. Each mesh, or part of it, has a corresponding material. Go to the ‘DogamerBoy.Materials’ folder and select the Outfit material.
Within the Inspector tab there are several options, but let's just focus on Color > Texture. Note that there are two boxes, one for ‘Lit Color, Alpha’ and ‘Shade Color’. In this case, both use the same texture but with a different luminosity. In the first HSV(0,0,100), basically the original color, in the second HSV(0,0,80), the same but with 80% of its luminosity. ‘Lit Color’ would be the color when light is reflected on the model and ‘Shade Color’ when there is shadow. You can change these color values by clicking on the adjacent ‘eyedropper’ panel, feel free to test it out. Another tip would be to change the angle values of the Directional Light component (in the object of the same name, within the scene hierarchy) to see the position of the shadows changing in the model. Our model uses the VRM/MToon shader.
To change the textures click on the small circle under ‘Lit Color’. A window will appear, in which you must select the new texture (if you have difficulty viewing it in the list, use the input field to type the name of the texture you are looking for, in this case ‘outfit_color-logo-2048’). Repeat this step under ‘Shade Color’. As in the image now you may have noticed that the appearance of our model's clothes has changed a little.
Try to broaden your vision on the model, more specifically on the t-shirt. In our example, our character could be a vtuber, virtual influencer, etc. While we, the users, are their interpreters. We have a logo, a username and their respective media. Remember that in the example vector drawing, you can change colors and icons however you see fit. I even suggest creating alternative versions of the clothing texture, exporting it, preferably in PNG, importing it into the project and loading it into the model. Alternate and see which one looks best on your model.
Now let's go to the 'DogamerBoy.MetaObject' folder, inside a file called 'Meta', when selecting it, in the 'Inspector' tab you will notice something similar to a 'character sheet'. There will be all the metadata of your model. We are going to change some fields, but first I suggest taking a quick read of the Model Information - VRM documentation, so you will know how to fill in the fields correctly. Starting with ‘Title’ we will change ‘Anthro Male Border Collie’ to ‘Dogamer Boy’ (or whatever you prefer).
Now in ‘Version’, we usually define the version of the model. I won't go too deep into versioning, but assuming your original version is 1.0 and you want to create a variant with some improvement, you can change to 1.1. Version number changes vary depending on the significance of the change. For more details on versioning read Introduction to Semantic Versioning, although the article focuses more on software versioning I think the same can be applied to VRM models.
In ‘Author’, the name of the model author is not limited to just one, and the name of the first author is recommended at the front. As the template was created under the CC BY license, I, the author of the original template, would be your co-author on a derived template. Basically you can change the mesh, texture, rigging, armature or any other element of the model, but I will continue to be your co-author, unless you create all the model components yourself, in which case the authorship is yours alone. You can also sell, gift or donate this model, as long as you not only give credit to yourself, but also give it to me. Note that you don't have to pay me anything (but I accept donations). Although it may seem restrictive, making such models takes time and work and giving me some credit (simply sharing my nickname and contact) won't make you lose a single penny.
In ‘Contact Information’ the URL or email of the first author must remain. In the 'Reference' field, the avatar's original/related works (URL), if any. In this case, it could be your link to a page related to your avatar, for example a profile page, a channel, etc.
In ‘Personation’, it describes ‘who’ and ‘what’ you can do with that avatar. If it is just for your personal use I suggest changing it to 'Author Only' or 'Authorized only for explicitly specified person', in the latter I suggest explaining in an external link the authorized person(s) in 'Other Permissions' or 'Reference' . The types of avatar performance, violence or sexual, are at your discretion, the same goes for commercial use.
Choose a license type, if it is for personal use, I suggest you change 'Licence Type' to 'Redistribution Prohibited' or 'Other', in this case define a URL with its own page explaining your license and its own terms. It could be a character/avatar sheet explaining who the author is and who can use it.
Lastly, let's change the thumbnail of our model, after all the image still has its old appearance and we want the new one. We can make a 'Print Screen' of our character in the current scene, save the image in a folder in 'Asset' (preferably in 'DogamerBoy.Textures', all image files related to the model are there), load the image by clicking in the small circle under 'Thumbnail', in the 'Inspector' tab, this will make a window appear with the images from our project. Another option is to click on ‘Screenshot’, next to the character’s thumbnail. As described, this will create a thumbnail from ‘Camera.main’. In Unity, the camera is the component that captures the game image or scene animation, you can see more details in Camera Component.
Let's take a Screenshot, but first let's adjust our camera. Select ‘Main Camera’ in the scene and in Inspector leave the settings as shown in the image below.
Note when the camera in the scene is selected, its preview image is visible in the lower right corner of the scene.
Before we continue, let's create a simple pose, so that the character looks better in the photo. In Unity you can manipulate bones/joints by selecting them within the model hierarchy, however, such components are not visible in the scene. You can make them visible with some extra settings or through add-ons like Unity Asset Store's Pose Editor. In the example we will pose without any add-ons, select the model in the scene hierarchy, set the Shoulder-R rotation to Z = -15 and UpperArm-R Z = -45. In Shoulder-L Z = 15 and UpperArm-L Z = 45. Our model will be in a more relaxed-looking pose.
After everything is adjusted, select Meta and in Inspector click on ‘Screenshot’ and save the new thumbnail in the project, then load it. If your image isn't very good, don't worry, you can create it later on another occasion, for example when you are performing with your avatar in some MOCAP software, like XR Animator, take a photo with a good pose, save in the project, export again.
After finishing the photo, you can return to the original pose by selecting each of the modified bones, right-click on the modified field (in this case rotation) and select Revert, repeat on the other altered bones.
If you didn't save your scene before creating the pose, simply load it in a previous state.
There are other settings available in a VRM model and so that this tutorial doesn't get too long, I intend to leave them for other tutorials.
At this point your model is ready. Select the Prefab of our model, either in the scene or in the ‘DogamerBoy’ folder, then select in the top panel in the left corner, ‘VRM0 > Export to VRM 0.x’.
A new window will appear containing the status of our model, in case of any inconsistency an error message will appear. Regarding the T-Pose, our model is already in this pose, if he wasn't we would have to click on 'Make T-Pose'. There are other settings here, but I won't go into details at the moment. Check the data in ‘Meta’ again to see if everything is in order, if so, click export.
I suggest that you save your new VRM file outside of the project, preferably in an easy-to-find directory so that you can load it into your application of choice.
Now let's do a test drive, in this case I will use the VSeeFace application. It may be that on your screen there is no avatar to select, click on ‘+ add avatar’.
After uploading your avatar, it will appear on your home screen to be selected. Now the next time you open VSeeFace, it will be available to choose from. Note that the metadata will also be visible, this is common in many applications that support VRM, I believe it is a way of checking the copyright of each model. Select your camera and microphone to get started.
Your preview will look more or less like the image below. Test at will, try making some facial expressions with your face or using hotkeys (Settings > Expression settings). Remembering that VSeeFace only supports facial tracking through the camera, other movements such as hands and arms only through a Leap Motion device or external application via VMC protocol.
You may be wondering, “Okay, we edit a VRM model, but how do we create one from scratch?” Well, basically we create a 3D (humanoid) character in some editor like Blender, Maya, Cinema 4D, etc. After making the model in a 3D editor, export it to FBX format and then load it into Unity. Create a Prefab from the FBX model and through UniVRM convert the FBX Prefab to a VRM Prefab. This is the traditional method but I won't rely on it in the next tutorials.
There is currently an add-on that allows you to export a Blender model directly to VRM format. This add-on is not as complete as UniVRM, which is the standard VRM implementation, but it is possible to finalize a VRM model just using Blender. This way you can start making your model in Blender, export it as VRM and finish it in Unity, eliminating the need to deal with the FBX format, in this case re-imports to update the model (topology changes, UV map, structure of the armature, blendshapes, etc.) become more agile. In addition to Unity, other game engines such as Unreal and Godot have extensions to support VRM.
Conclusion
And that's it for today, folks!! Although we only changed the model's shirt (remembering that you can change other textures if you want, such as the color of the eyes, fur, body, nose, etc.), I think it's enough to start recording videos with your own avatar. In the next tutorial we will do something similar, but using Blender.
Extras
Best practices for organizing your Unity project
VMC Protocol specification | VirtualMotionCaptureProtocol
VMC Protocol Reference | Implementation and Usage | Examples Introducing available applications
VRM4U | Runtime VRM loader for UnrealEngine
Which applications can use VRM files? - VRM documentation
References
CC BY 4.0 Deed | Attribution 4.0 International | Creative Commons


