

Hello reader, welcome! In the previous tutorial we used two files in Blender to replace the mesh of one or more objects, now we will use Unity. We can use the same project as the first tutorial, if you haven't created one yet, create a new one.
Getting Started
First in Assets, create two folders with the following names, 'JoggingWolfGirl' for the model we created in the previous tutorial and 'JoggingDogGirl' for the model we are going to modify (if you haven't created the 'JoggingWolfGirl' template, you can download it). In the JoggingWolfGirl folder we can simply drag and drop the VRM file of the same name and it will automatically be imported as a Prefab or we can go to Topbar VRM0 > ‘Import from VRM 0.x’ .

Now in the case of ‘JoggingDogGirl’, I suggest importing via Topbar, as we have not yet created a file with the same name, so we can choose the new name. We can choose to import ‘DogamerGirl.vrm’, which we created in the last tutorial, or ‘anthro_female_bordercollie.vrm’, from my samples. Remembering that importing using the 'drag and drop' method causes the generated files to have the name relative to the source file.
After importing the model, drag and drop the JoggingDogGirl Prefab into the current scene hierarchy for better visualization.

Now go to the Project tab and go to ‘JoggingWolfGirl > JoggingWolfGirl.Meshes’, select the meshes 'FemaleAnthroBody_mesh' and 'AthleticWear_mesh', then press 'CTRL + D', this will duplicate the selected meshes in the same folder, note that the new meshes receive a number at the end of the name in a similar way to Blender. Drag and drop the new meshes to JoggingDogGirl > JoggingDogGirl.Meshes.


So far nothing has changed in the target model. Select the model in the scene hierarchy or in the folder it is located in and in the Inspector tab click on ‘Open Prefab’.

Inside the model select ‘Outfit’, in the Inspector tab go to ‘Skinned Mesh Renderer > Mesh’ and change ‘Outfit_mesh’ to ‘AthleticWear_mesh 1’. Then do the same for ‘FemaleAnthroBody’, replace ‘FemaleAnthroBody_mesh’ with ‘FemaleAnthroBody_mesh 1’. You'll notice that the appearance of the model parts has changed, but the textures still don't seem to be the correct ones for Outfit (you can rename it to AthleticWear if you want), but we'll update them later, first let's make another adjustment.


In the ‘Skinned Mesh Renderer’ component there are settings related to Bounds, according to the Unity documentation, Bounds “defines the bounding volume that Unity uses to determine when the mesh is off-screen. Unity pre-calculates the boundaries when importing the mesh and animations in the model file and displays the boundaries as a wireframe around the model in the scene view.” We won't delve too much into the technical details, but it seems that even after replacing the mesh from the previous garment with another, the Bounds values remained the same. As the new garment is smaller, the limits than the previous one, limits should be reduced.
Before we proceed, I should consider this step optional, as I didn't find anything regarding Bounds in the official VRM documentation or anything similar in Blender, so it may be that these Bounds definitions are only relevant in Unity. If you just want to export to VRM format, you can skip this step to the next one. Now, if you want to adjust to test this feature in Unity, whether to prototype some animation, game scene or just on a whim, do the following, with AthleticWear (outfit) selected in 'Skinned Mesh Renderer' click on 'Edit Bounds'.

When clicking on 'Edit Bounds' the box surrounding the selected object will now be editable, you can adjust the limits manually by manipulating the box or changing the values in Bounds (Center and Extend), use JoggingWolfGirl's 'AthleticWear' as a reference. Another simpler way would be to copy the clothing Bounds values from one model to another, to make it easier, use a notepad or similar application. In the case of our example the values are:


After adjusting the bounds, now let's fix the textures. First go to the JoggingWolfGirl > JoggingWolfGirl.Materials folder, inside this select the AthleticWear material, in Inspector, at the top select the rightmost option (three dots) and choose ‘Copy Material Properties’.
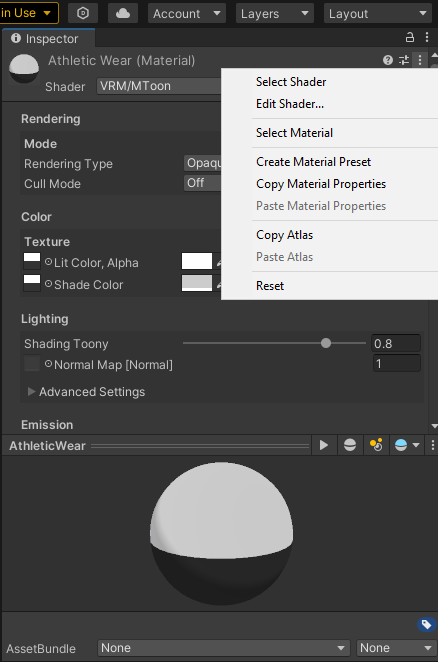
Then go to the JoggingDogGirl > JoggingDogGirl.Materials folder, select the Outfit material (you can rename it to AthleticWear if you want), and in Inspector, in the same drop-down list, but now choose ‘Paste Material Properties’.

All property values from one material were passed to the other, including references to textures. However, the referenced textures are in the other model's folder. In principle this would not be a problem, because when we export the model to VRM format, all the files that make it up will be copied and compressed into a single file and in this compressed file a new directory structure is created, with all the files properly organized. However, it is not appropriate to have parts of the model spread across directories of other models, especially if we work with many others in the same project, ideally each texture should be in the folder corresponding to its model. Otherwise, if you are working with several models that use the same image texture, a suggestion would be to create an external folder for common textures, so we wouldn't have so many copies of the same image, as several models would be referencing the same one.
The AthleticWear material has two textures, one for colors, usually a diffuse map, and another for outline width, usually an ambient occlusion map. The visual difference of this map in MToon is very subtle, I suggest that in outline change the mode to WorldCoordinates and Width to 1.0, then in the Texture Slot switch with and without texture to notice the difference, basically the contour seems to fit the texture map better. First let's make a copy of 'FemaleUnderwear_AO.png' in JoggingWolfGirl.Textures and paste it in JoggingDogGirl.Textures (via your operating system's file explorer). As you can see in the image below, the colors of the current outfit do not match this model, so instead of copying the texture image (colors) from one model to another, let's add a new one.

If we take a look at AthleticWear_mesh's UV map we will notice that it is very simple, made up of two UV islands, so creating a new color texture will be easy, basically two rectangles of different colors. Use your application of choice to create a new texture, feel free to create more details if you wish.


Once created, import it into the project, preferably in JoggingDogGirl.Textures, and load the material in ‘Lit Color, Alpha’ and ‘Shade color’.
 preview.")
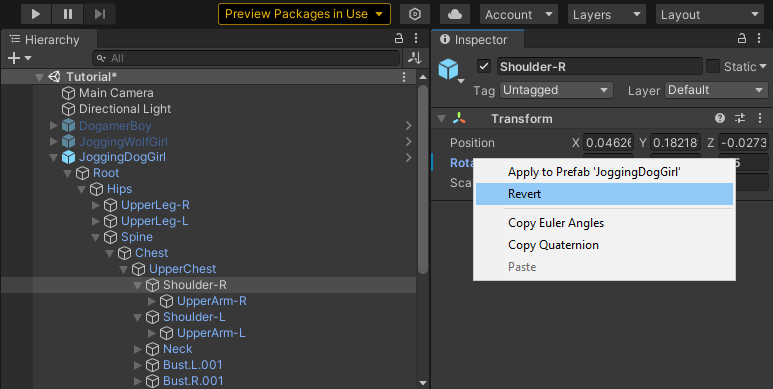
After changing the textures, let's now create a thumbnail for the model. First let's create a pose, select the model in the scene hierarchy, set the Shoulder-R rotation to Z = -15 and UpperArm-R Z = -45. In Shoulder-L Z = 15 and UpperArm-L Z = 45. Our model will be in a more relaxed-looking pose.

Select ‘Main Camera’ in the scene hierarchy and set the values below, feel free to test other values.

Now go to JoggingDogGirl > ...MetaObject, select Meta and in Inspector click on Screenshot. Save in JoggingDogGirl.Texture, after saving, load the new Image. Take advantage and update the values in Meta, such as the model name.

After finishing the photo, you can return to the original pose by selecting each of the modified bones, right-click on the modified field (in this case rotation) and select Revert, repeat on the other altered bones. If you didn't save your scene before creating the pose, simply load it in a previous state.
At this point the model is ready to be exported. In the topbar, go to VRM0 > ‘Export to VRM 0.x’. Check that everything is in order and export.

 settings before exporting.")
Load the newly exported model into an application, like VSeeFace for example, and test it to your heart's content.

Conclusion
And that's it for today! Probably in the next tutorials I will talk about my templates, through them I hope you will be able to create your own original characters. So until next time!
Extras
Best practices for organizing your Unity project
Manual: Skinned Mesh Renderer component