


Introduction to Anthro Canine Template
Project structure details

In this tutorial we will cover the Anthro Canine Female/Male templates, detailing the project inside and its best use. At the time of writing this text there are only two gender variants (male and female) and two species variants (wolf and border collie dog), totaling four model samples, the files are saved in version 3.3 LTS of Blender. I intend to gradually introduce more variants, in the case of these templates a few more dog breeds. I may possibly create more templates in the future, such as Anthro Feline, Bovine, Cervine and so on. I'm not very interested in creating templates for humans or similar humanoids (such as elves, dwarves, gnomes, orcs, etc.), as there is already several software on the market dedicated to creating this type of character, but few dedicated to anthropomorphic characters. I must assume that you, the reader, already have basic knowledge of Blender and know topics such as modeling, painting textures, painting and editing vertex weights, modifiers, etc. Each of these topics requires its own tutorial and I'm just going to mention them, the purpose of this tutorial is just to explain the structure of my templates. If you are not familiar with these topics, I recommend taking a look at the end of this article for extras and references.
Explaining the structure
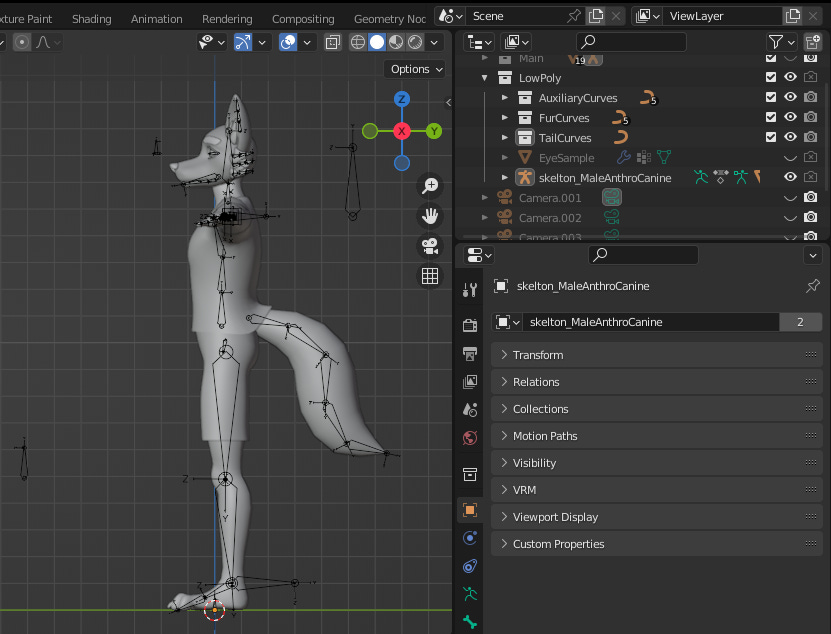
Let's start with the ‘Anthro Male Canine’, when opening the template in Blender this may be your first view. Let's dissect the project little by little, in Outliner, the Display Mode is in View Layer, in this mode the collections and objects of the current scene will be displayed, each collection for a context. The ‘Scene Collection’ is the parent set, it cannot be edited, all objects need to be within it to be present in the current scene. Main is where our model will be ready to export. LowPoly is where a low poly version of our model will be, it will be very useful for adjustments to our main model.

Let's look at each collection from the inside. First in LowPoly, here are some meshes in their most simplified version. Looking inside you will notice three internal collections, AuxiliaryCurves, FurCurves and TailCurves (I will discuss these curves later), the EyeSample object, which is an eye separate from the main model, is interesting for testing new shape keys (blend shapes), others textures and new UV maps before implementing them on the model's eyes. Blender allows us to transfer certain types of data from one object to another, as long as both have some properties in common, such as the same number of vertices, for example.
Another interesting object is the MeasureCube, this object is used to measure the height of our model, through the Measureit addon. As you can see, MeasureCube is configured with the addon to measure from its origin (center of its geometry) to the origin of the scene (Location X = 0, Y = 0, Z = 0), so we can obtain the height of our model positioning the center of the cube over the head. It is common to define the height of an anthropomorphic character by counting the ears or horns, when they exceed the height of the head, but as our model is modular it is better to use the top of the head as the height. MeasureCube and EyeSample are present in both LowPoly and Main, in Blender it is possible for an object to be present in more than one collection.

Another way is to use Blender's standard measurement tool to obtain the height, use Snap to facilitate positioning the cursor from the origin of the scene to the top of the head. MeasureIt tools are more customizable than standard measurement tools, but use whichever one suits you best.

Armature
Next we have ‘skelton_MaleAnthroCanine’ (or ‘skelton_FemaleAnthroCanine’), the armature of our model, present in the LowPoly and Main collection.
Inside our armature we have parts (objects) that make up our model, remembering that our model is modular and that some parts of the body are separate, such as the head, ears, tail, nose and the rest of the body. Note that in some objects further down it is not possible to enable and disable viewport or render, this is because these objects are present in another collection, but as armature is present in this collection and in the other, these child objects end up being visible in the hierarchy.

Still on armature, our model's has several bones separated into different layers, let's look at some layers closely. Starting with the first layer, in the first frame, this has all the basic bones of our model, all variations must have them when exported, so this layer is mandatory.

The layer just below (2nd line, 1st column) has the bones of the current tail (Tail_A) of our model, the adjacent layer in the same line, are also tail bones, but for another one that is not present in this template, it is still being modeled in an external file. New parts will be added and updated over time. Tail bone layers are optional.

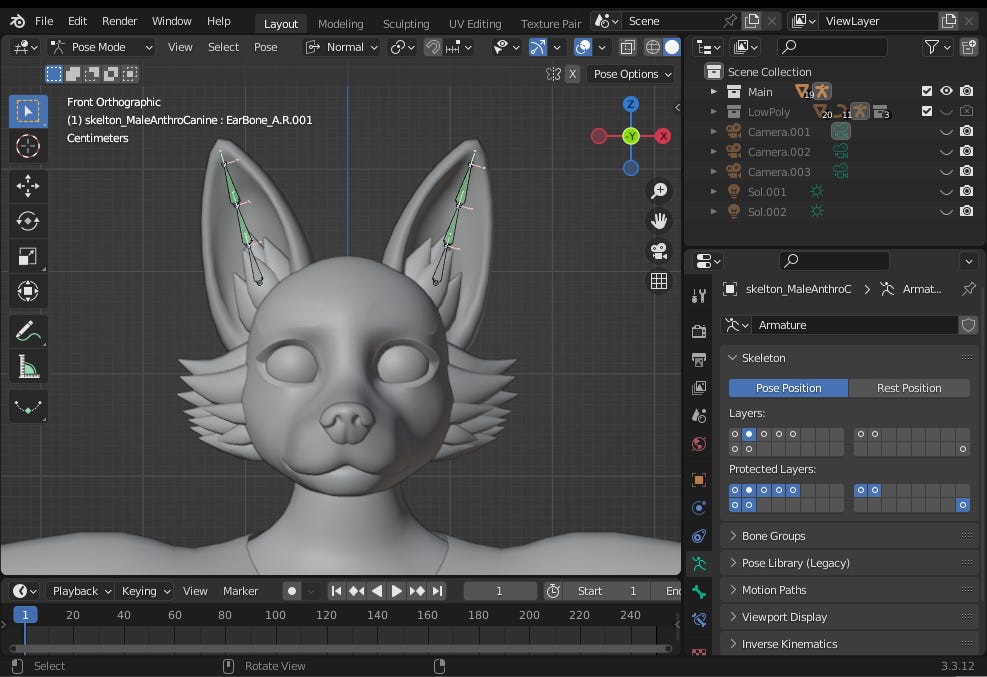
The layer in the 1st row, 2nd and 3rd column corresponds to the CanineEar-Type_A and B ear bones respectively, in this template only these ears are present. Still in the same line, there are the layers of the 4th and 5th columns, these contain ear bones that are still being made.
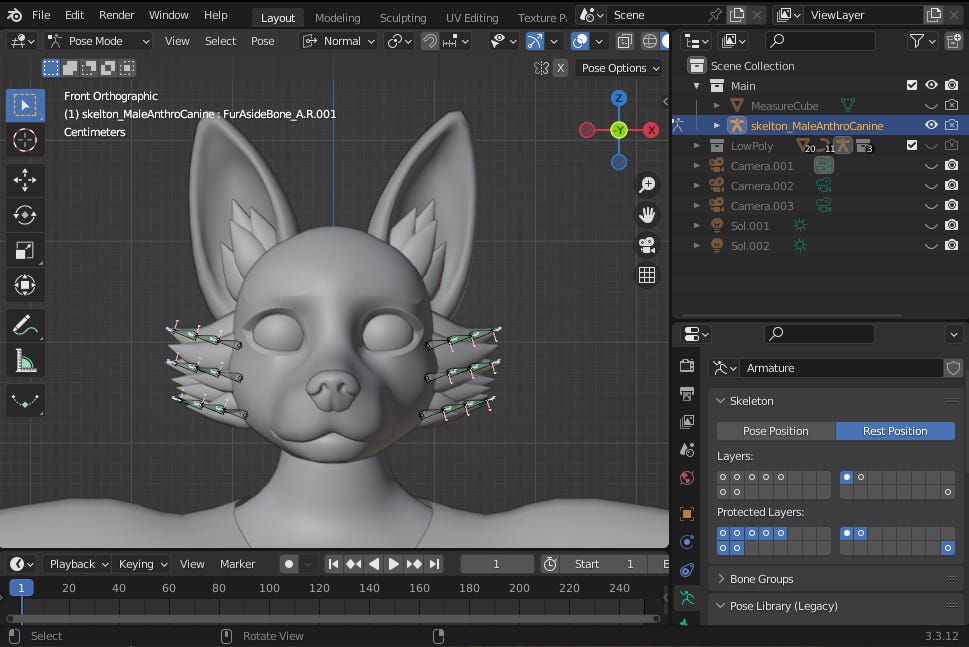
Now in the second layer frame, in the 1st line. 1st and 2nd column, we have the facial hair bones, FurHeadAside_A and B respectively. There is not much difference between these bones, just that each one follows the direction and shape of each facial hair, for example type A with a ruffled appearance and type B with a more droopy appearance.
The last layer, in the second frame, has the control bones such as IK (Inverse Kinects) Bones and Target Bones, plus those of the jaw and tongue. Control bones are useful for testing the armature and mesh of the body, as with these bones we can manipulate several bones in a chain at once.
In the case of the jaw and tongue bones, they were primarily created to generate Shape Keys, via ‘Save as Shape Key’ by armature. In the VRM documentation the bone corresponding to the jaw is optional, I didn't find much information on how to configure it correctly, so I recommend that all movements such as visemes, smiles among other gestures with the mouth and tongue must be saved as shape keys. The bones in this layer should not be imported, they are only for testing in Blender.

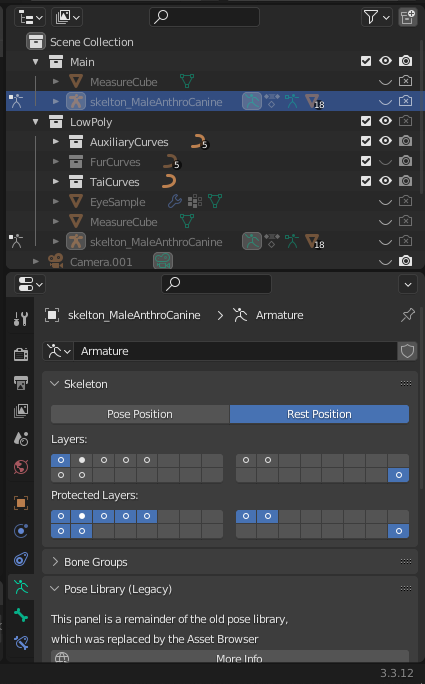
The template model uses the old Pose Library in place of the current Pose Assets. The reason is for two facts: I'm still learning about Pose Assets, Pose Library still seems simpler to implement. In the Object Data Properties tab of our armature (Running Person), in the Pose Library (Legacy) property, you can switch between two pose libraries, PoseLib_Ears for the ear bones, PoseLib pose for the rest of the body. Feel free to test the poses in the libraries and create new ones if you want.

Ears
Let's look at some objects inside our armature up close, starting with the ears, we have two so far. Type A canine ears are erect, pointed and with some hair, they are best suited to species such as wolves and foxes or dog breeds such as German shepherd and husky. The type B ear is folded at the tip but not so droopy and erect at the base, it would fall into a category between cocked and bottom ears, common in dog breeds such as border collie, fox terrier and Brazilian terrier.


The main movements of the ears are made by shape keys, these movements are used to combine facial expressions. The bones in the ears have two purposes, to create shape keys through armature (Save as Shape Key) and to configure Spring Bones Groups, a physics simulation system for hair, clothes and the like in VRM.
If you want to create a new shape key in one of the ears, you can create a new ear pose, or select an existing one like 'CanineEar-Type_B_Pricked-1', for example, and save it as a shape key in a low or high poly object (tip: save a once with 'Preserve Volume' enabled and disabled again, compare the difference and keep the shape key you thought was best), then make adjustments in edit mode with the selected shape key, if necessary. Rename the new shape key Armature (by default, shape keys created by modifiers receive their name when applied or saved) to ‘Pricked’ or whatever name you prefer.
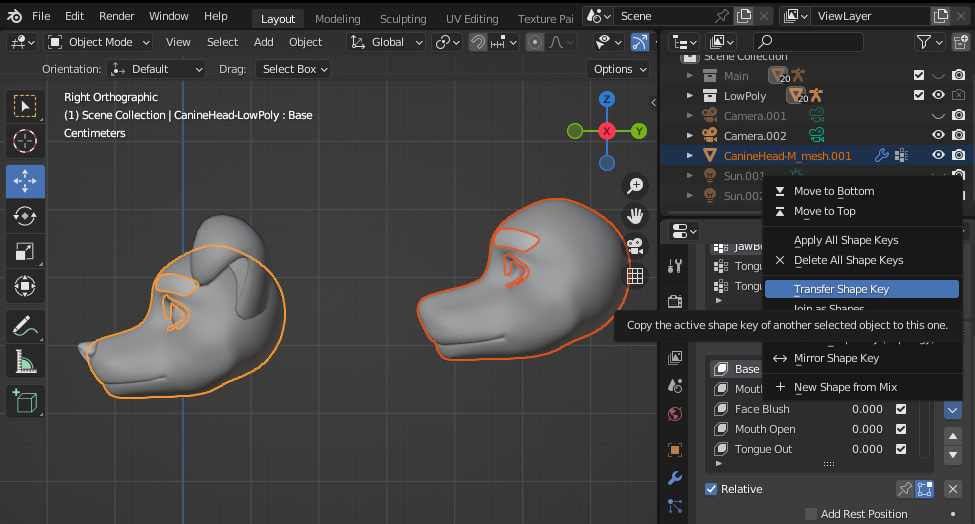
To decide whether to create a new shape key in a low or high poly ear, it will depend on the complexity of the shape key. For example, if the new shape key only depends on a pose to be created and little or no adjustments in edit mode, it may be the best choice to create it directly in the high poly ear. However, if the new shape key requires a lot of adjustments in edit mode, it may be more appropriate to create it in the low poly ear, in this case, we would have to transfer the new shape key from one object to the other. Select a low poly ear and another high poly ear of the same type, switch to local view (press '/' or in the View header > Local View > Toggle Local View), then select the low poly ear first and leave the shape key 'Pricked ' selected then select (with SHIFT pressed) the high poly ear and in the Shape Keys property go to 'Shape Keys Specials' (drop-down menu, below the + and - buttons) and click on 'Transfer Shape key'.

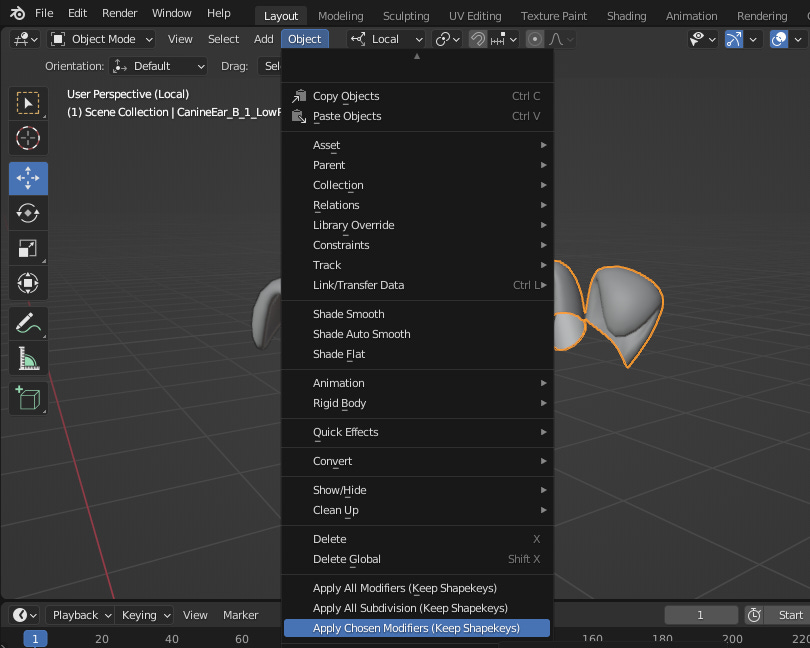
An error message like “Skipping 'CanineEar_B_1', vertex count differs” will probably appear. In other words, it is not possible to transfer a shape key from one object to another if the number of vertices is different. To resolve this issue, we will copy the low poly ear and apply the Subdivision modifier. However, another error message like “Modifier cannot be applied to a mesh with shape keys” will appear. We have already dealt with a similar situation in the tutorial “Replacing VRM model mesh in Blender”, in this case with the Mask modifier and in the same way we can solve it with the SK Keeper addon. With the addon installed, select the copy of the low poly ear in Header and go to ‘Object > Apply all Subdivision’ or ‘Apply Chosen Modifiers’.
Now you will be able to transfer any shape key, since the number of vertices have been equalized.

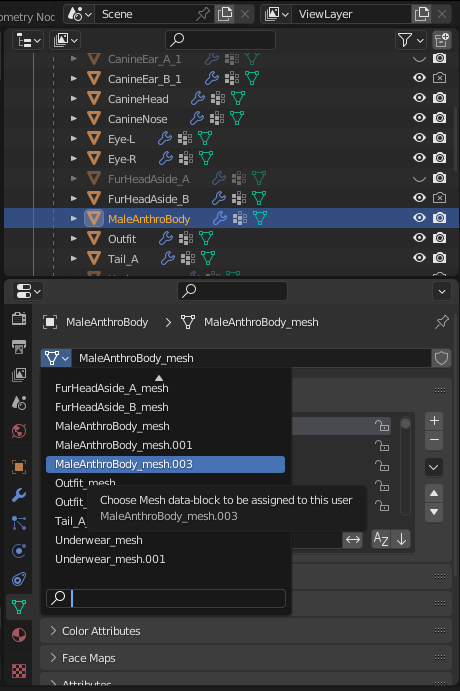
Now, if instead of just creating one or more shape keys we also changed the topology of the ear? Going back a few steps, before we applied the Subdivision modifier to the low poly ear copy, we could change the mesh to get a better appearance or better deformation in the movements. In this case we would not be able to transfer any shape key since the vertex count could be different when applying the subdivision and in addition we would like to pass the mesh optimizations to the high poly ear. In this case we should only replace the mesh of the high poly object already configured in the VRM properties instead of replacing the object as a whole, this method is more detailed in the tutorial “Replacing VRM model mesh in Blender”. As shown in the image, we can replace the mesh of an object with another.

Body and Outfit
Let's look at some more objects from the low poly collection, such as Outfit-LowPoly, select this object and switch to edit mode. As you can see in the image, the mesh appears to be smooth even with few faces or vertices, this is because a subdivision modifier is in use.

If we go to the Subdivision modifier and disable it we will see the mesh in its real shape, with a flatter appearance. Its use is interesting when we want to obtain a smooth mesh with only a small number of faces, however the mesh is not permanently changed, the subdivision by modifier works as a preview, if we want to export the mesh with a smooth and organic appearance, we need to apply the Subdivision modifier first.

At first it seems like a simple task, but in the case of some meshes such as body and outfit, more adjustments are still necessary. This is because these meshes are more dependent on Armature in their deformation during movements. For example, if we change the model's pose to 'LongJump' or something else, we will notice that the deformation of these meshes appears very smooth, however if we move the Subdivision modifier above Armature we will notice that some parts of the mesh appear rigid during the deformation , as shown in the images below. This is because Blender's modifiers operate in a stack, that is, the first's effect is activated first, then the second's, and so on. It's as if we said to Blender, “first deform, then subdivide”, when 1st Armature, 2nd Subdivision and the opposite when 1st Subdivision, 2nd Armature.


When we apply a modifier, the practical effect is as if it were the first on the stack, but this time the changes are permanent. In the case of skinned/rigged meshes, when we apply subdivision, the weights of the new vertices will be the average of the previously existing adjacent vertices. But in most cases, this automatic weight assignment is not enough to make the mesh smooth during armature deformations, in which case we need to adjust the mesh weights manually. In this template, the body and outfit meshes in their high poly versions already have their vertex weights adjusted, but feel free to modify them if you see fit.

If you want to change the topology of the low poly meshes and update the changes, make the changes to a copy of the low poly meshes, test with poses, see which mesh deforms better, it may be necessary to make some adjustments to the vertex weights of the new mesh. After testing and confirming that the new topology had better performance, make another copy and apply the Subdivision modifier (if the object has shape keys, it may be necessary to use the SK Keeper addon, as in the previous example). Now with the high poly version of the mesh with improved topology, transfer the weight of vertices from the old high poly mesh to the new one. Blender allows this type of transfer even if the meshes have a different number of vertices or topology, they just need to have a similar shape . This will save you time because you won't need to make as many adjustments to the vertex weights. If you are not satisfied with weight painting of the vertices of my meshes, you can import a rigged mesh from external software such as VRoid or MakeHuman, or from a website such as Sketchfab.
Another alternative for transferring vertex weights from one mesh to another through DataTransfer would be to use auto rigging solutions like Accurig or Mixano. In any case, keep in mind that whether transferring vertex weights or generating new weights automatically, it may be necessary to change the current armature, such as renaming bones or creating new ones.
To transfer vertex weights, first select the armature and in Object Data properties and define Rest position in Skeleton.
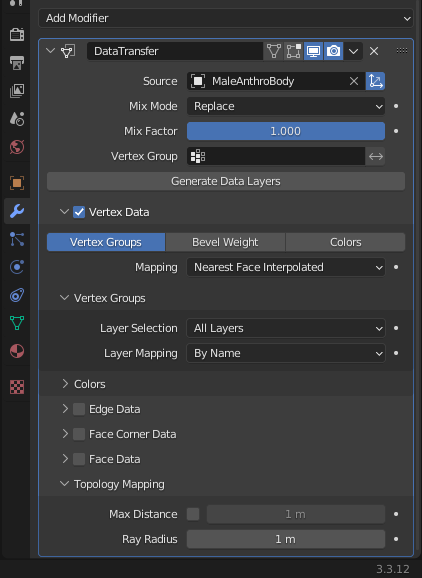
Then select the target object (the one with the new topology) and ensure that it has no modifiers or vertex groups, then add the DataTransfer modifier, define the source object (the one with the vertex weights) and configure it as in the image. Once configured, click on ‘Generate Data Layers’.
This action will create new groups of vertices, but they will not have assigned weight values yet. If we switch to Edit Mode the Vertex Weights panel will not be available in ‘Sidebar > Item’, but if we switch to Weight Paint the influence of vertex weights will be visible.
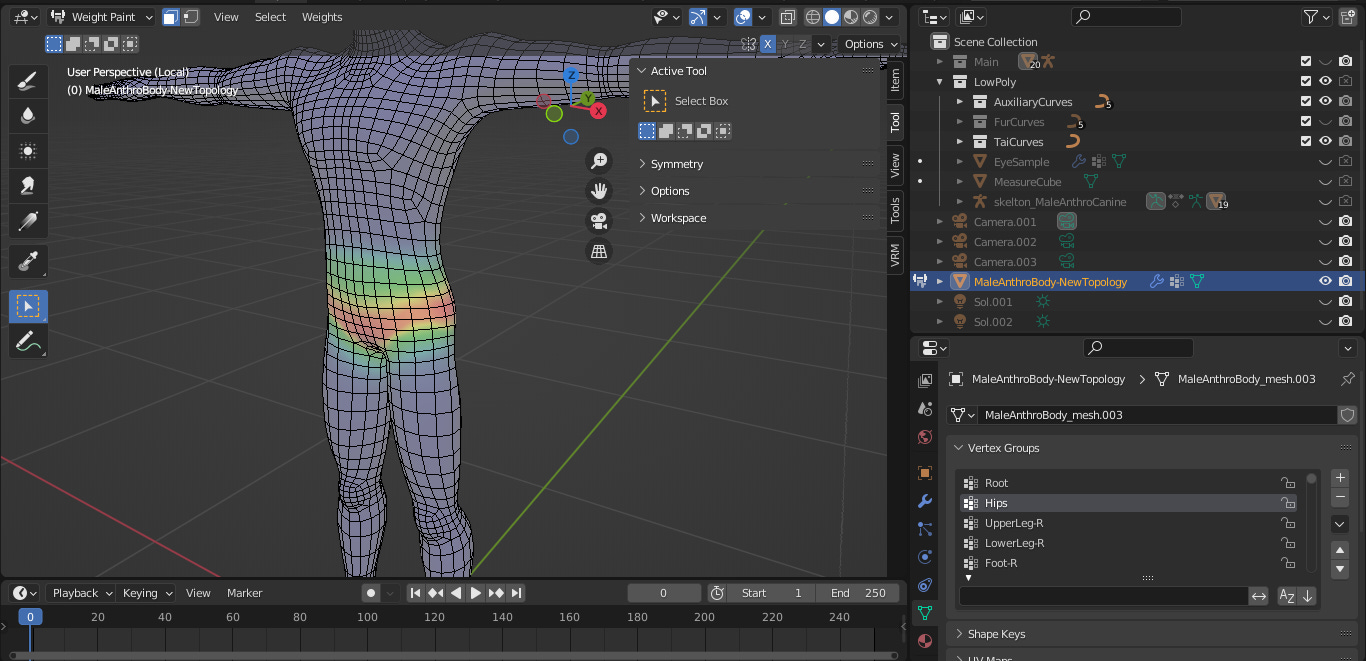
However, if we disable the Realtime of the DataTransfer modifier, the influence of vertex weights will no longer be visible. This is because in general, Blender modifiers generate previews and not definitive changes.

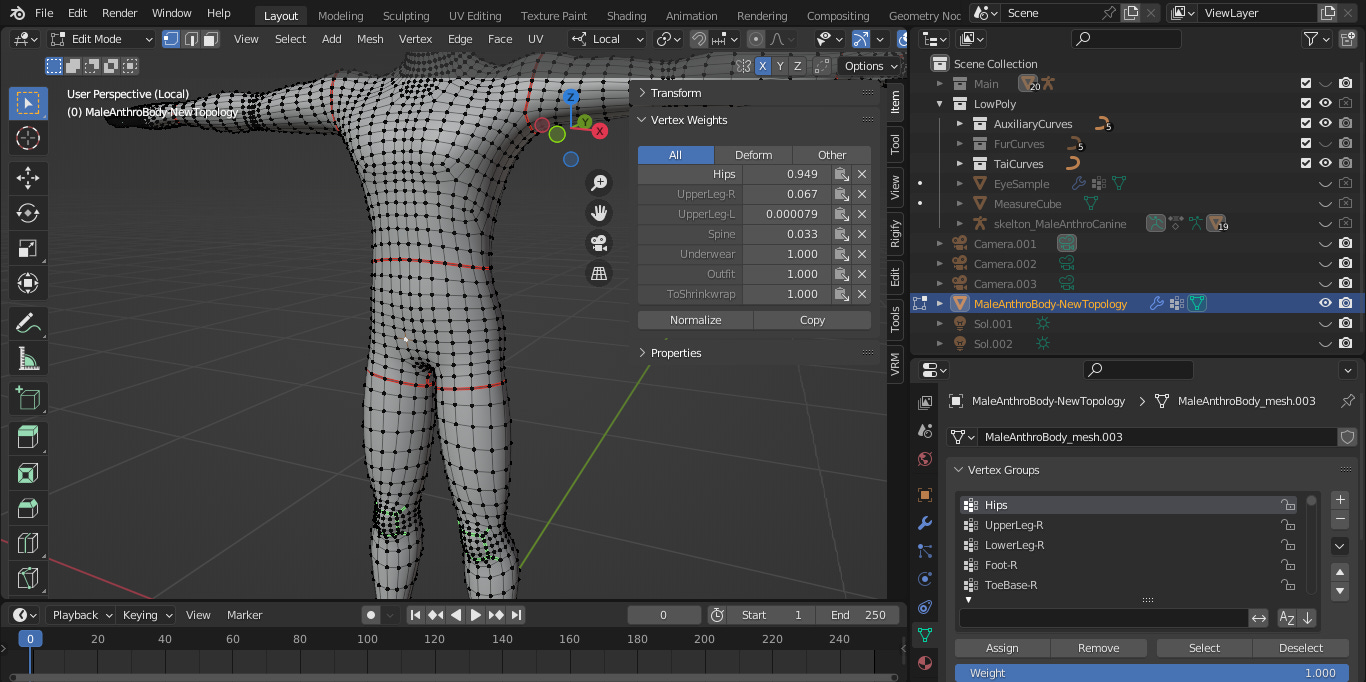
In this case we will apply the DataTransfer modifier, after applying it we can switch to Edit Mode and we will notice that the Vertex Weights panel will now be visible.
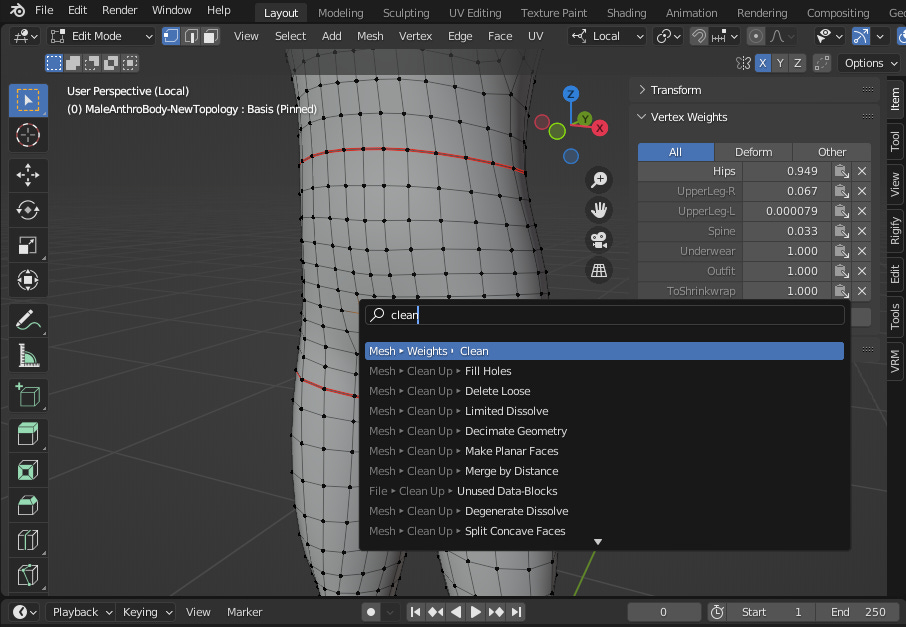
A tip for adjusting vertex weights is to use the ‘Clean’ command to delete weights below a certain value, preferably very low values such as 0.0001, and Quantize to round the vertex weight values, for example step = 10 for low poly meshes (min: 0, step: +100, max: 1000 ) and step = 100 for high poly meshes (min: 0, step: +10, max: 1000), if you want to make further adjustments to the vertex weights, either in Edit Mode or Weight Paint, I recommend leaving Quantize for last. When applying these commands in Edit Mode, remember to select all vertices, otherwise the changes will not be effective on the entire mesh. A quick way to access any command/function in Blender is to press Spacebar and type the name in the search field, as shown in the image. This method is very interesting for accessing less visible commands in the interface.
After the new mesh's vertex weights are adjusted, we can replace one object's mesh with another, as in the image below. Do more testing with poses and more adjustments to vertex weights if you feel necessary.
You can delete the object where you created a new mesh or use it to store the old mesh, which will be left unused, if you deem it necessary.

A disused component (meshes, materials, images, etc.) is known as Orphan Data, this data is considered temporary and will be deleted the next time the file is loaded, unless it has a User (Object) or a Fake User (continues to exist even without being linked to an object). To create a fake user, simply click on the shield next to the component, it will be filled with a 'confirm' icon when enabled. You can access Orphan Data by changing the Outliner Display Mode.

Curves, Fur and Tails
Now let's talk about curves, they are only present in the LowPoly collection and each group of curves in their respective collection, to facilitate identification. The curves used as a basis for the tail and facial hair are Poly Curves, the simplest type of curve in blender, these curves are using Bezier Circles in Bevel, this property is used to determine the shape of the curve, and Nurbs Curves in 'Taper Object', this property is responsible for the thickness along the curve segment, for example the tail has a medium thickness at the beginning, is thicker in the middle and very thin at the end.

The possibility of generating geometries from curves is very interesting, since we can control the shape by manipulating a few vertices. Curves can be converted into meshes, being very useful in generating hair, tails, horns, among other elongated shapes. In the case of our model, the curves were used to generate the tail (TailCurves) and facial hair (FurCurves). AuxiliaryCurves contains the curves used to control shape and thickness. The meshes generated by the curves are present in the HighPoly (Main), Tail_A, FurHeadAside_A and B collection. These meshes are not necessarily high poly, we can call them mid poly. The bones used in the facial hair and tail meshes were created primarily to operate with VRM Spring Bones, but it may be possible to create some custom animations, something like 'Wag Tail' for example. The format for exporting animations may vary from one application to another, such as FBX or BVH for example.
The curves are not present in the female model, the reason is because many meshes in this model are copies of the male version, but with different proportions. For example, instead of recreating the tail from a curve, with new configurations of vertex weights, materials, new topology (in the case of the tail, the generated mesh was modified to have more layers at the tip in order to create a fur appearance), etc., simply import the finished tail from one model to the other. But if you feel the need to create a set of curves in the female template, feel free.
Head
Lastly we will address the head, it is the most complex part of the model. It has the most materials and shape keys, it is the most complex composite mesh in the model, it is also the mesh that concentrates the most vertices, since facial expressions require smoother deformations. I recommend that you test the blendshapes one by one to see all the possible facial expressions and views.


Just like the ears, most of the movements are made using shape keys, the jaw and tongue bones, as mentioned previously, are used to test and create shape keys and should not be exported. The Head bone is responsible for all the biomechanical movement of the head, this is an obligatory bone and must be exported.

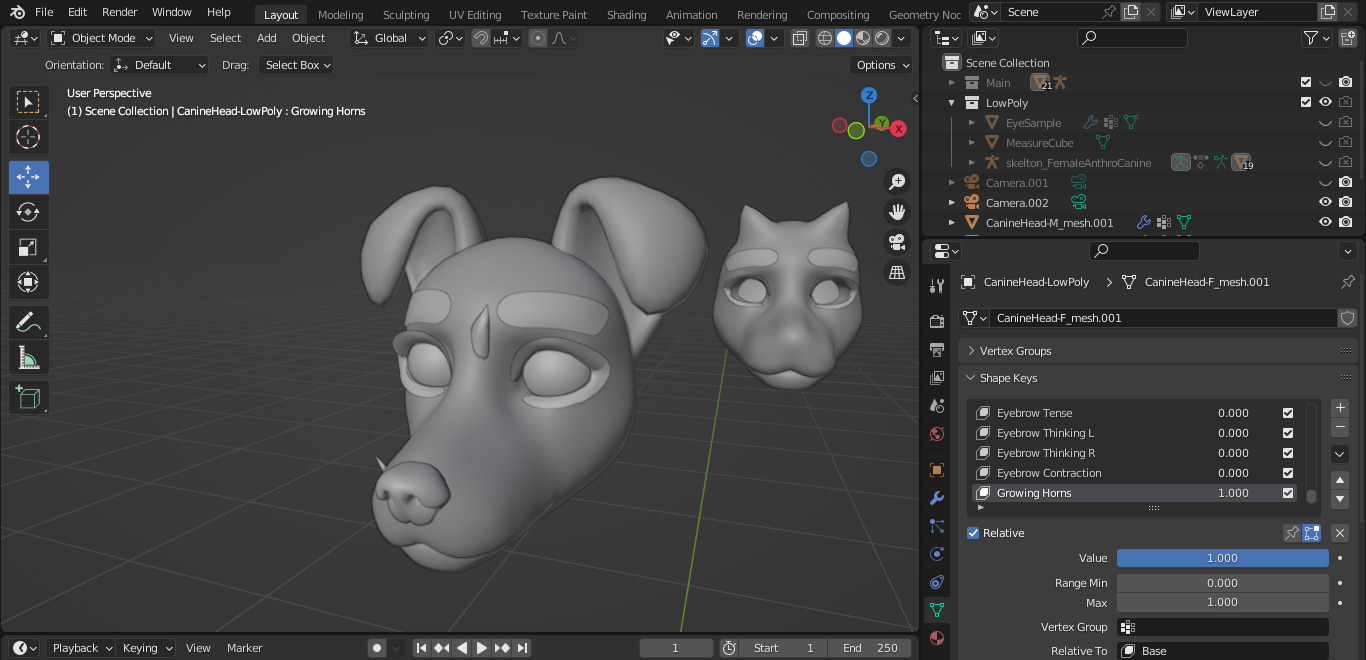
If we were to create a new shape key, something like 'Growing Horns' for example, from the low poly head, we would simply make a copy, apply the subdivision modifier, with the SKKeeper Addon, and transfer it to the high poly model linked in the Vrm settings, or if we make a lot of other changes, perhaps it would be better to replace the mesh on the target object, just like we saw on the ears or on the body.S
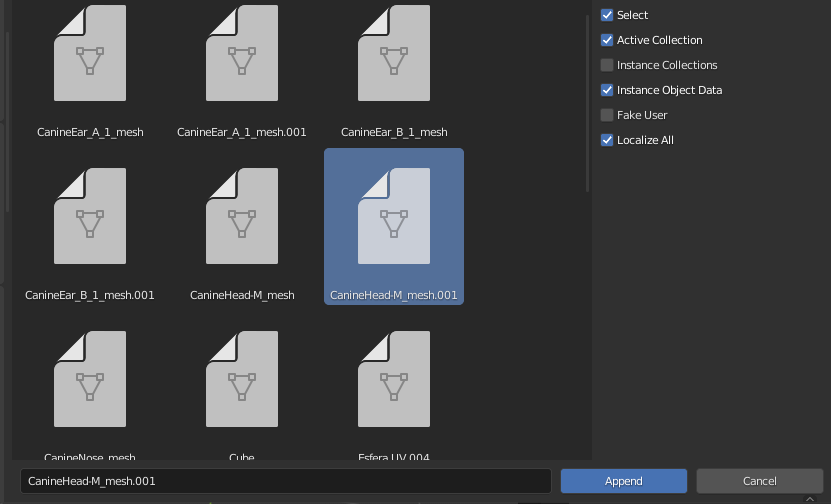
But if we were to transfer the new shape key to another model, more specifically to Anthro Female Canine? So far we have only covered the male version of the model, as the topics cover both in general. Let's open the female template and make a copy of our male model's head, using append (File > Append > Mesh), remembering to have saved the new shape key before.
With the copy of the male head already imported, try to import the new shape key for the female head. You may encounter this error message “Skipping 'CanineHead-LowPoly', vertex count differs”, similar to what we saw with the ears. Although the heads appear identical, with just a few different proportions, the female head has slightly longer eyelashes and more faces than the male version, consequently with a different number of vertices.
To solve this, we can separate the eyelash mesh on both heads, as a separate object, to later put it back together. Go to edit mode, position the cursor over the eyelashes and with 'Select Mode: Face' activated, use the 'L' key to facilitate selection, remembering that they are made up of three parts each. Then press ‘P’ to separate the mesh from the object (Separate > Selection). Do the same with the male version that was imported.

Now both heads must have the same number of vertices. If we try to transfer now, apparently it may have been successful, after all no error message, but when viewing the new shape key on the female head we will notice that the displaced vertices are wrong, but why does this happen?
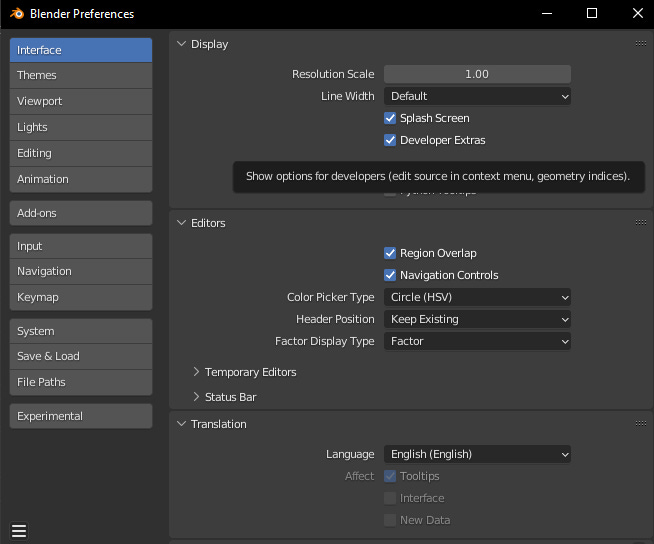
Well, first let's go to ‘Edit > Preferences > Interface > Display, enable Developer Extras’.
Then in Edit Mode on any of the objects, go to Viewport Overlays and enable ‘Indices’. You will notice that the selected vertices will appear with numbers on them. If you select some of these vertices in one of the heads and try to compare them with an equivalent vertex in the other you will notice that indices are different, which is why our shape key does not stay the same when transferred. But why are vertex indices different from their peers? Well, as we edit a mesh, adding or removing vertices, the order of the vertex IDs changes, it’s something we can’t control and changing these values manually is very complicated.

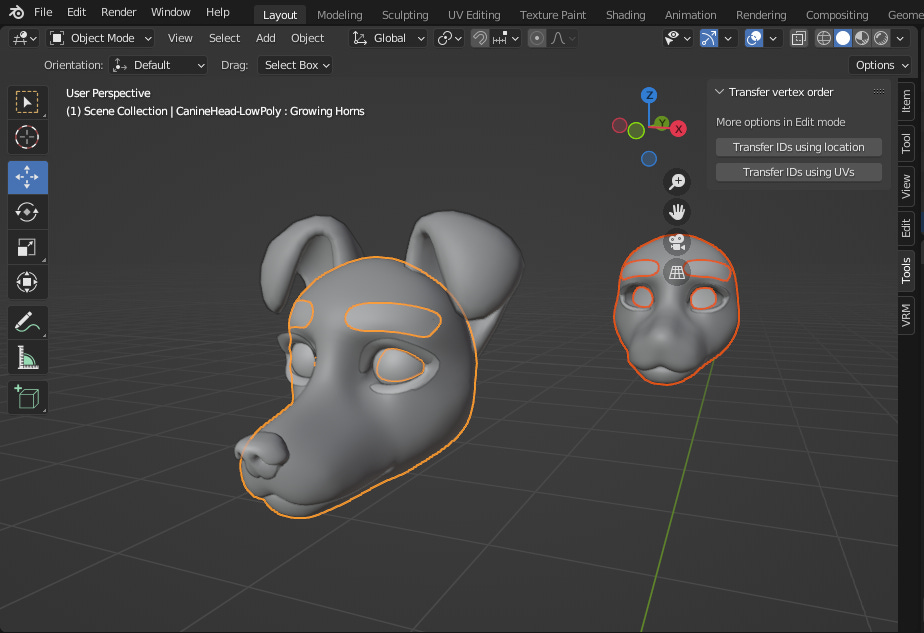
To solve this we will need an addon called ‘Transfer the vertex order’. With this addon we can copy the order of the mesh vertex indices from one selected object to another, as long as they have the same topology. In the image below, in ‘Sidebar > Tools’, the addon offers us two options in Object Mode (and two more in Edit Mode), 'Transfer ID using location' will cause the IDs to be copied from the position of the vertices in 3D space, recommended for meshes that have exactly the same shape, which is not our case, the mesh of our heads are slightly different, although they have the same topology. In our case we must use 'Transfer IDs using UVs', this option will cause the IDs to be copied from the position of the vertices in the UV map, as both have the same UV map the vertex indices must pair correctly.
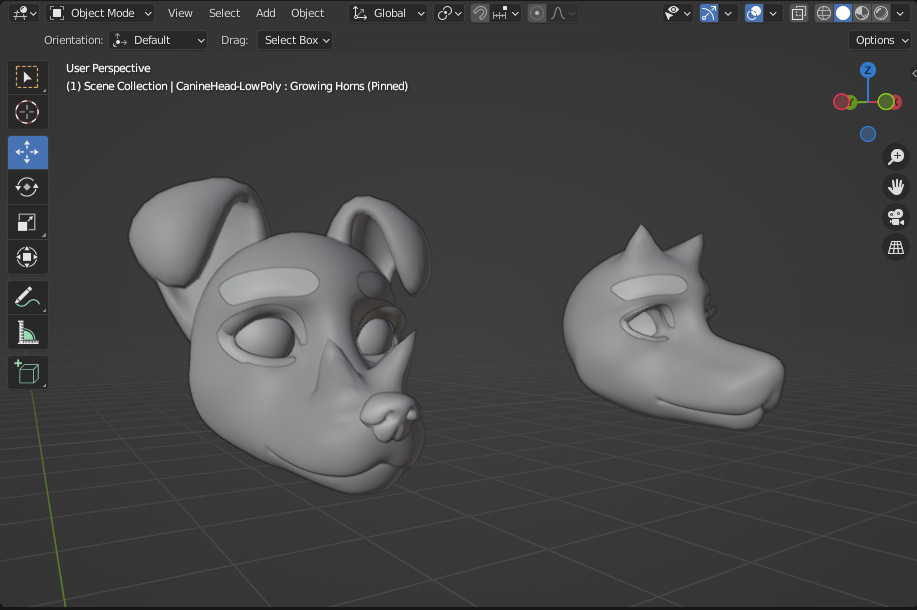
If we go to Edit Mode, with both objects selected, we can check that the vertex IDs are the same as their respective pair. However, the ‘Growing Horns’ shape key didn’t adjust itself, so let’s delete it on the female head and try to transfer it again.

Now both heads have the same shape key, feel free to test and compare. You can join the eyelashes to the head again, just select both and press ‘Ctrl + J’ to do so. In Edit Mode select the eyelashes plus the part of the eyelids closest to them and then press 'M > Merge > By Distance', to form part of the same mesh as before.

But what if the UV maps of the objects were different? Well, in that case we would have to use the Magic UV addon. With the source object selected, in Edit Mode and with two adjacent faces selected, press ‘U > Copy/Paste UV > Transfer UV > Copy’, then with the target object the same steps ‘... > Transfer UV > Paste’. This method transfers the UV Map from one object to another based on topology, the other options are based on vertex indices, in our case the primary problem.
But if instead of separating the eyelash meshes, we added more vertices to the male eyelashes through loop cut ('Ctrl + R' in Edit Mode), to make them more similar to the female eyelashes and with the same number of vertices , then try to transfer the vertex IDs from one object to another using 'Transfer IDs using UVs', as seen before? Well, the result could look like the image below. This is because the UV map of the eyelashes are a little different, but for the other parts of the head they are the same.
Now we can erase the imported male head. Next, what if you try to pass the new shape key to the high poly head? Let's repeat the same method used in the ears to transfer a shape key through a copy. You may have noticed that the same problem occurs as before, but why? The high poly head is the exact subdivision of the low poly, when we change the order of the IDs of the low poly vertices, we consequently change the IDs resulting from the subdivision.

To solve this, simply replace the mesh from one object to another.

You might be wondering, is it worth all this effort for a shape key? Well in our case not much, as this is easy to reproduce, but if it were a more complex shape key like a new viseme, for example, it would be worth it. Remembering that we are only dealing with objects from two generic models, but imagine if you were working on a project, be it a game or animation, and you had several characters, each with their own model to be worked on, but all made from few templates, this means that the majority would have topologies in common. If you found it necessary to create one or more shape keys in a model, using a workflow with the 'Transfer the vertex order' addon, you could transfer these shape keys in each of these models without much difficulty and without the need to reproduce them. them in each of them.
Conclusion
Well, that's all for today! This tutorial covers the structure and organization of the Anthro Canine Female/Male templates in a very general way. In the next tutorial I will continue covering these templates with more details about VRM configurations and export. To the next!
Extra
3D Viewport Pie Menus — Blender Manual
Blender Addon: Transfer the vertex order
Add Curve Extra Objects — Blender Manual
Add Mesh Extra Objects — Blender Manual
12 Types of Dog Ears: From Pricked to Floppy!
ArtStation - Hair With Curves - Blender Tutorial
Blender 2.82 : Rigged Character Weight Paint Transfer (In 60 Seconds!)
Blender Tutorial The Best Way To Apply Modifiers To Shape Keys
Fix your SHAPE KEYS! - Blender 2.8 tutorial
Reference
Topology | 3D Modeling Resources
Phonemes and Visemes - CRYENGINE Manual
Selecting- Introduction — Blender Manual
Modifiers - Introduction — Blender Manual
Data Transfer Modifier — Blender Manual
Weight Paint - Introduction — Blender Manual
Weight Paint - Editing — Blender Manual
Transfer Mesh Data — Blender Manual
Shape Keys Panel — Blender Manua
Armature - Introduction — Blender Manual
Constraints - Introduction — Blender Manual
Inverse Kinematics Constraint — Blender Manual