


AI assisted 3D remodeling
Using AI tools to help with 3D editing workflow

Intro
Hello everyone! It's been a while since my last tutorial. It takes a while to develop new content because it involves research, study, and practice. In the meantime, I intend to keep up to date with new tools, after all, we have been experiencing a new technological innovation in the early 2020s: generative AI.
When I started writing the first drafts of my yet-to-be-created blog, in mid-May 2023, news about generative AI was already circulating. Technologies like Chat-GPT, for example, answered questions, performed searches, generated texts, among other tasks, all in an optimized and personalized way. At first, it only provided textual content, but soon it began generating images, sounds, videos, and 3D models; it is the latter that we will focus on.
 em comparação com Week")
At first, I was very anxious about all these innovations coming so quickly, a mix of fear and curiosity. It didn't take long to realize how much this type of technology could increase the productivity of those who create digital content. A dilemma soon arose for many: whether it was ethical or not to use AI. This is not an easy answer, as it can involve copyright issues, more specifically regarding the data and content used to train generative AI tools.
In general, I personally think that if AI services (companies) have rights to use this data, then as an end user I see no problem in using them, but be aware of the terms of use of these tools in your projects. On the other hand, we can install a generative AI ourselves on our personal computers or configure it on a remote server, but in this case the data used, such as in models and LoRAs, to generate results may be under our responsibility, remembering that each AI model has its own license.
It is worth remembering that as it is a recent technological innovation, which is still in the process of being regulated, issues of copyright and other types of legal use may change over time and vary from one country to another.
Getting Started
Now to contextualize this tutorial, imagine that you have downloaded a sample model or template from me or another author and would like to use it in an animation or game, however you do not want each character to look the same even if they are derived from the same model. For this we need some concept art to serve as a reference for the new characters. Creating this art can take time, so we can use an AI tool to speed up the process. In my case, I used Leonardo AI, you can use the AI tool of your choice, but I recommend that you use one that has the img2img feature.
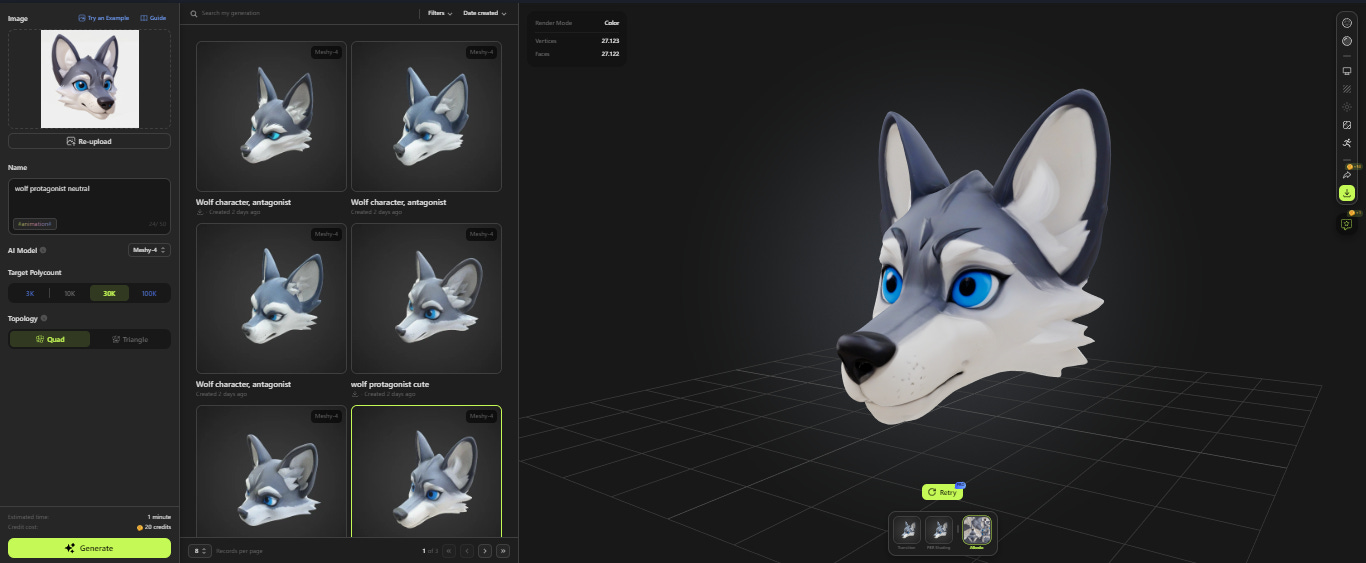
In the example below, as a guide image I used only the head of the male wolf character, without the side facial hair, as I wanted to make the reference as minimalist as possible. The fact that I did not include the entire body is because it is a modular model and the rest of the body can be modified separately, but this will become more evident later on.


The first one from the top left is the original, followed by the derivatives with the prompts:
Top Right:
Wolf character, protagonist, neutral, head onlyBottom Left:
Wolf character, protagonist, cute, head onlyBottom Right:
Wolf character, antagonist, neutral, head only
Note that the prompts are very simple, among the reasons is that they are images generated from another reference image, in addition to using AI and LoRA models (the ‘AlbedoBase XL’ model and the LoRA ‘s ‘3D Sculpt’ and ‘Fantasy Icons’), so so much description may not be necessary.

In the example below, images generated with the same configuration as the image above, except for not using a reference image. Although these are good results, they differ from the model we want to change.


The goal of this tutorial is to modify an existing model in order to reuse the shape keys and vertex weights without having to create a new model. From the generic model we can remodel it into one of the stylized models.
The next step will be to use an AI tool to generate 3D models from images. For this tutorial, I used Meshy AI. Feel free to use any similar tool of your choice. Tools like this also generate 3D models from prompts. However, generating a 3D model usually takes longer than generating images. So, in a way, it is more economical to generate a reference image first and then generate the 3D model (also because it makes the result more predictable).
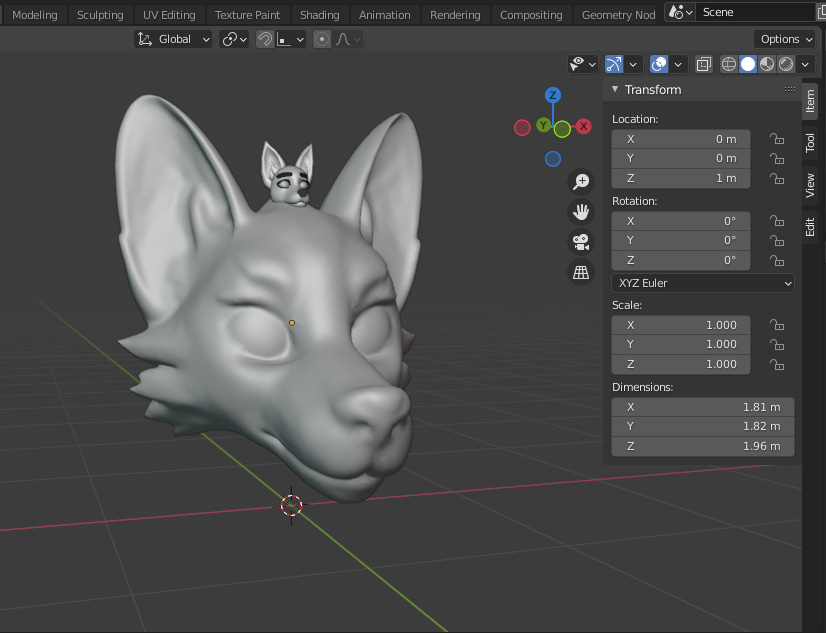
As shown in the image below, the resulting model is very close to the concept art. Note that the polycount of the generated model is limited. Knowing this fact, I focused only on the character's head to ensure that the details of the face had priority. If the concept art were the full-body character, the total number of vertices would have to be evenly distributed to the rest of the body, so the details of the face would not be a priority. Remember that the model to be edited is modular, which makes it easier to edit the parts separately.
In Meshy you can download the model in different formats such as fbx, obj and even blend, Blender's native format. I recommend that you download it in blend format, as both the mesh and texture are saved in the same file and you don't even need to import it into Blender, just open it with it.
When opening the downloaded model we can duplicate it in a separate object, the intention is to edit the copy a little to use it as a type of mold for the final model in another file and keep the original as a backup in case the edits to the copy are not satisfactory.

To begin, we can enter Edit Mode, press the space bar and type the Symmetrize command to make the mesh symmetrical. This will make editing easier.


We can also use the Tris to Quads (Alt J) command to turn most of the triangles into quads, which makes it easier to view and edit the mesh.

Then we can go to Objects Properties and then enable Wireframe to view the faces and edges in other modes, such as Object and Sculpt.

Now in Sculpt Mode, we can make some edits to the shape of the mesh in order to correct any deformations, if any. In the case of this model, we have an exaggerated volume below the chin, we can reduce it with the Smooth brush. Remember to enable symmetry in the brush settings. For each case, use the brushes that you think are best needed.

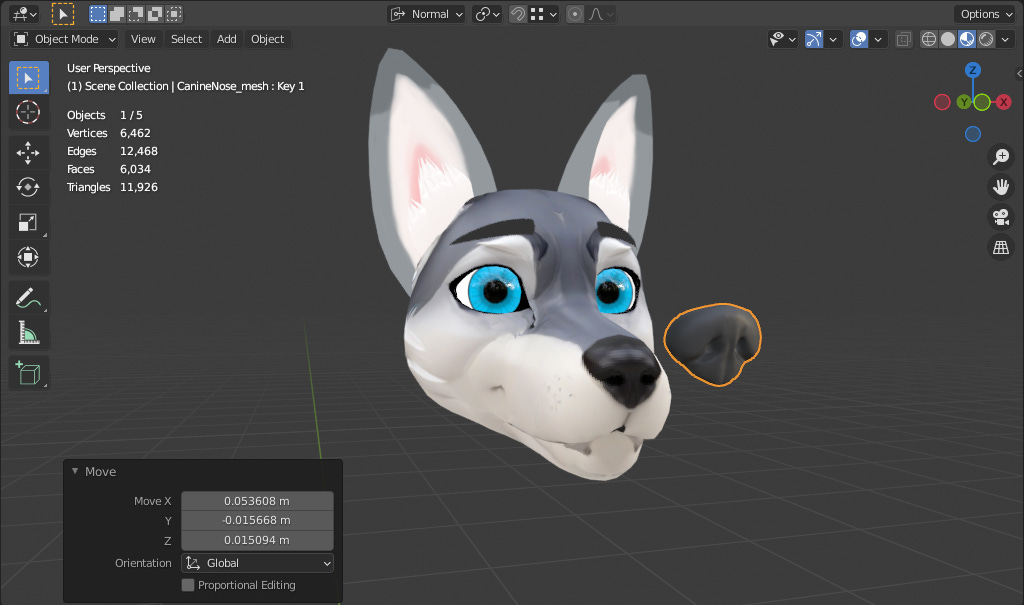
After adjusting the mesh, we can import the final model into the current blend file or into a separate one, using the append operator (‘File > Append’ or ‘Shift F1’). Select at least these four meshes: head, ear, nose, left and right eyes from the template or sample model.

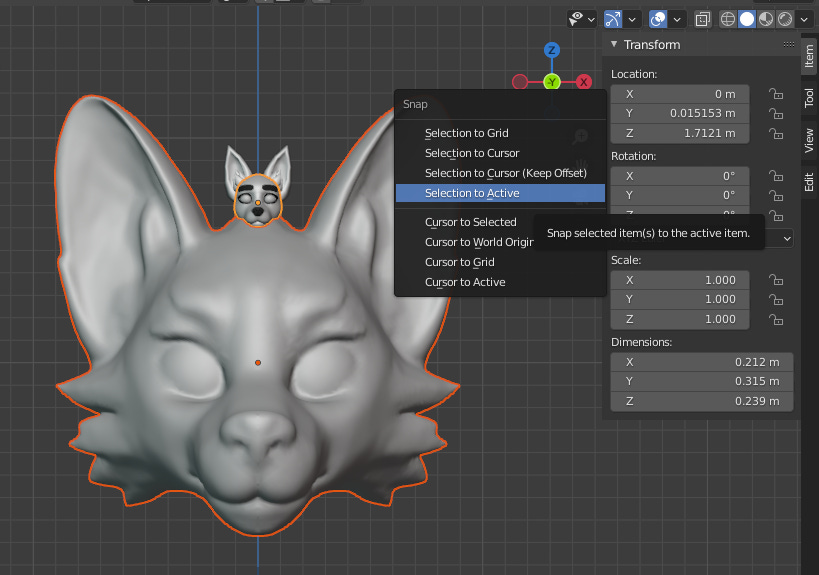
After import, the dimensions of the mold model are likely to be larger than the final model. Since the former is a single mesh, unlike the latter, we will try to resize it to dimensions closer to the other.
Mas antes, vamos ajustar a origem de cada cabeça para seu centro de massa. Podemos ir em ‘Object > Set Origin > Origin of Mass (Volume)’ ou ‘Shift Ctrl Alt C’.

Then, select the mold model and the final model with Shift pressed, then use the ‘Shift C’ command and choose the ‘Selection to Active’ operator, this will move the first selected one to the location of the second one.
Now with both objects in the same location, try scaling the mold model to final model dimensions.
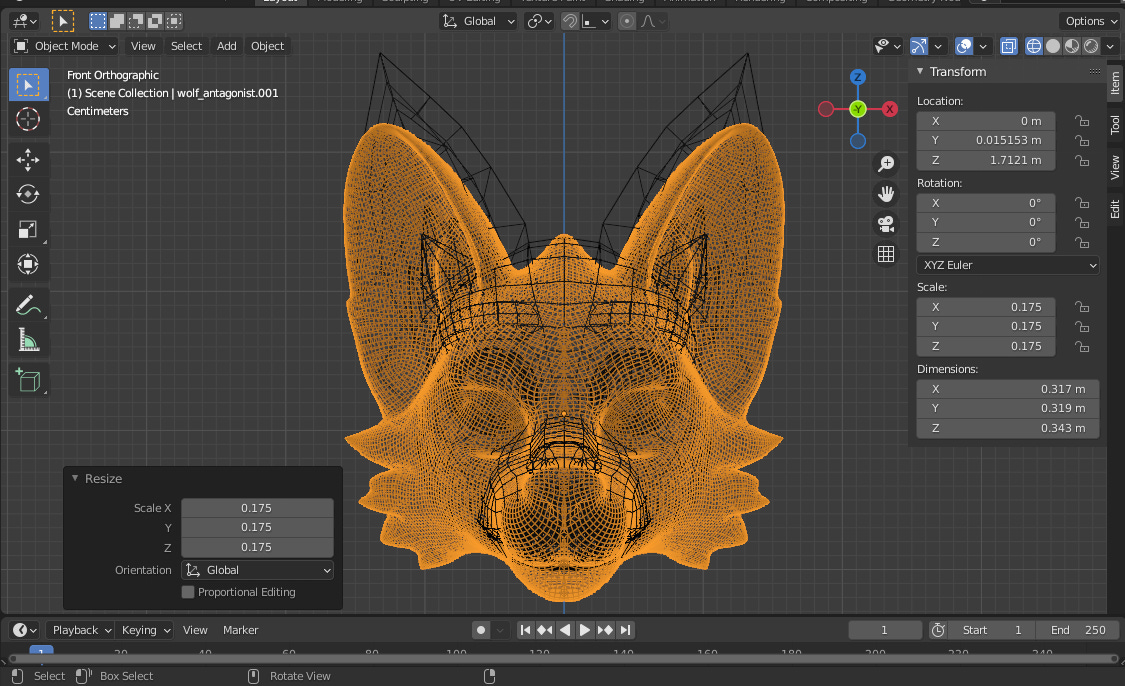
Now we just have a few more adjustments left. The angle of the characters' faces may be different, we can rotate them a little. We can also change the location of the mold model a little to better fit.


Now let's focus a little more on the final model. Let's create a group of vertices called “MoldShrinkwrap” (it can be called something else, but I recommend that it be contextual). The inner mouth and teeth will not be in this group, since the mold model does not have these parts. The extremities such as the lips, eyelids and eyelashes will not be there either. I recommend that these parts be adjusted manually. Also create a group of vertices for the inner mouth and teeth mesh, if it does not exist, to hide with the Mask modifier, so that we can better focus on the face.

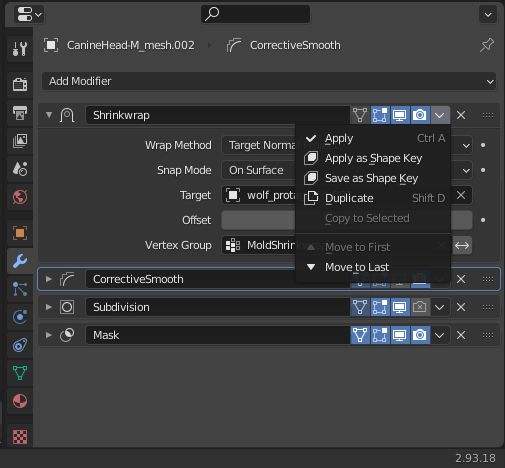
After defining the vertex groups, let's add the Shrinkwrap modifier. This modifier molds one object into another, making the first one resemble the shape of the second one. Note that there are several configurations. Experiment as you wish and see which one best suits your model. When both objects have the same topology, it is possible to mold them perfectly, but when the topology is different, which is the case, the final object ends up with a shape similar to the mold object. The function of the Shrinkwrap modifier is to help us with the remodeling. The rest of the remodeling is manual, but with it, we're already halfway there. You can notice that the nose was not affected, this is because it is a separate object, we can edit it later.


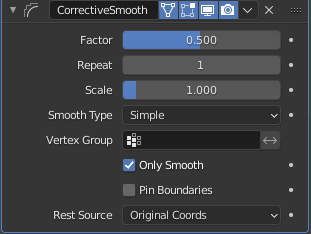
Another modifier that can help us is Corrective Smooth, as the name suggests, this helps to keep the mesh smooth even during edits. You can use these suggested settings.
With the adjustments made, we can start editing the mesh, but first we have to apply the Shrinkwrap modifier. However, when clicking on ‘Apply’ the following error message will appear: “Modifier cannot be applied to a mesh with shape keys”. As you may have noticed, our mesh has Shape Keys and it is not possible to apply the modifiers directly, but we can use the Blender addon SKkeeper, which allows us to apply one or more modifiers through ‘Object > Apply …(Keep Shapekeys)’.

Another option is to apply or save the modifier as a shape key, making the modifier changes be saved in a new shape key (by default the name of the new shape key is the name of the modifier, in our case ‘Shrinkwrap’). I recommend using the ‘Save as Shape Key’ option, this will be more convenient for our workflow. After that, disable ‘Realtime’ and ‘Render’ of the modifier.
With the shape key saved, leave it selected and go to Edit Mode, select the entire mesh and use the ‘Mesh > Snap to Symmetry’ operator, this will make the vertices readjust to be symmetrical in relation to their peers. Also, don’t forget to enable mesh symmetry in X.

I would like to mention a few more details before we start editing the mesh. The eyebrows and the ‘blushed cheeks’ are part of the head object but they are separate meshes. I suggest editing them towards the end when the face is almost finished, so we can readjust these meshes without too much rework. We can select these meshes and use the hotkey H to hide them and ‘Alt H’ to reveal them again during editing.

Assuming you have finished editing the mesh to make the final model look like the mold, we can also copy the textures from one model to another using Render Baking, this feature is only available to the Cycles render engine. Let's prepare a collection that will contain only the objects that will be used in baking. Let's duplicate the final model and keep the mesh that makes up the external part of the head, except for the eyebrows and eyelashes, these and the rest can be deleted. Rename the new object as <OriginalName>_Target or another if you prefer. Remove the old material slots and create a new one called ‘Bake’. Duplicate the <OriginalName>_Target object and rename it <OriginalName>_Cage, the latter will help us in baking, more details later. The 'Baking' collection should look like the image below.

The cage object must cover the perimeter of the target and mold objects for better baking, but there is a catch: the original model mesh does not include the ears, nose and longer facial hair on the sides, as these are separate objects. In this case, we can try to achieve the best possible perimeter, with only the nose and facial hair involved; the ears will be excluded as they are more complex parts to be covered. Another important detail is that the cage object must have the same number of vertices as the target object.

You will also need to create a target texture, we can call it ‘Bake’ or something similar, you can use the default settings if you prefer, keep in mind that the higher the resolution of the target texture, the longer the baking processing time will be. Remember to save the image before proceeding.


Some settings before baking. As shown in the image, the render engine should be Cycles and the Device for processing should be CPU or GPU (faster) by default, if available for your system. In Blender Preferences (Ctrl Alt U) you can check whether your GPU is compatible or not with one of the GPU acceleration methods. Generally, newer versions of Blender use newer GPUs, so if your GPU is not compatible with the version you use, try searching for an older version that is compatible and install it separately.


The baking settings should look similar to the image below.

Now go to the ‘Shading Workspace’ to bake, select the mold object first, then the target object. Make sure the node that corresponds to the target texture is selected, then click the Bake button under Render properties.

The resulting texture should look similar to the image below. Some details to note: some parts of the texture came out blurry, this is because it was not possible to correctly cover the mold object due to its complexity in relation to the cage and target objects.

The nose of the final model is a separate object, so in this case it is not necessary in the texture. Blurs and other unnecessary elements can be removed or changed in Paint Mode.
Assuming you have finished editing the generated texture, we can make some more changes to the mesh, starting with the eyebrows, these were not affected by the Shrinkwrap modifier, so we will adjust them manually. Note that the eyebrow mesh and part of the forehead mesh have markings in common. The first is initially a duplication of the second and the markings are to help with editing shape keys. If the eyebrow moves, the nearby forehead region also deforms. The eyebrow has more vertices, as the intention is to make the deformations smoother.

We can un-subdivide the eyebrows to adjust them more easily and then subdivide them later. With the eyebrows selected, press the space bar and type the command ‘Un-Subdivide’.


Now adjust the eyebrow vertices to align with the even vertices on the forehead, according to the marking. The result should be close to the image below. Note that the vertices are close to the pairs, but not too close. There needs to be a little distance so that the meshes do not cross each other.

One of the reasons for separating the eyebrows from the rest of the head is to allow for different textures to be loaded just for the eyebrows, as shown in the images below. Another advantage is that it makes it easier to deform the meshes for shape keys. I recommend testing the eyebrow shape keys to see which texture (or none) best matches the rest of the face.


After adjusting the eyebrow, we can now define the ‘Shrinkwrap’ shape key as ‘Basis’ by following the steps below: select the entire mesh in Edit Mode and, with the ‘Basis’ shape key selected, use the ‘Blend from Shape’ function. In the ‘Shape’ input field, change ‘Basis’ to ‘Shrinkwrap’. Now the shape of the new shape key becomes the base shape. You can delete the ‘Shrinkwrap’ shape key if you want. Test all the other shape keys to see how they adapt to the new base. Some may not adapt well, so in this case, some manual adjustments will be necessary to these or to the base.


After adjusting the shape keys, we can add some details, such as facial hair. In our case, we can use curves to generate meshes, through the Geometry panel in object properties, which makes it easier to create elongated shapes such as hair and fur. The final result should look like the images below. The final model may not be identical to the reference model, but it is quite different from the original model. Therefore, we were able to achieve our goal here, create another original character from a base model using some AI tools to help.


Conclusion
In this tutorial, we use an AI-generated model to remodel another ready-made model with the intention of creating a stylized character from a generic one. I think it's important to mention that we could take another approach using retopology instead of remodeling, which in practice would be to redo the mesh instead of readjusting it. Although with retopology we could create a more optimized mesh that is more faithful to the mold model, we would also have to create the internal mouth and teeth manually, remembering that the mold model does not have these parts visibly, in addition to having to create all the shape keys as well.
I plan to do more tutorials like this, using AI to help with the workflow. It's important to keep in mind that generative AI is just a tool that speeds up processes, it doesn't do all the work. That's all for today, see you next time!
Extras
ArtStation - Hair With Curves - Blender Tutorial
Iconic Super Mario Princess Peach Made With Character Creator and Blender - Reallusion Magazine
Reference
How to use Stable Diffusion Img2Img - PC Guide
Low-Rank Adaptation - Civitai Wiki
U.S. Copyright Office says some AI-assisted works may be copyrighted | Reuters
What is Retopology? | Autodesk
Render Baking - Blender Manual